![[Note]](/media/com_docimport/admonition/note.png) | Note |
|---|---|
|
This feature is only available in the Professional release |
The Web Application Firewall feature of Admin Tools is designed to
offer real-time protection against the most common fingerprinting
attacks, used by attackers to deduce information about your site in
order to tailor an attack to it, and the most common attacks. The
real-time protection is performed by the "System - Admin Tools" plugin
(plg_admintools). Before configuring Admin Tools'
WAF you have to make sure that the plugin
is published and it's the first to run, i.e. it should appear
first in the ordering menu. These conditions are automatically applied
when you install the Admin Tools bundle. However, if you have installed
more system plugins make sure that plg_admintools is published before
all other system plugins. If not, the protection offered will not be
thorough.
When you launch the Web Application Firewall feature of Admin Tools you are presented with its panel page:
The Web Application Firewall page
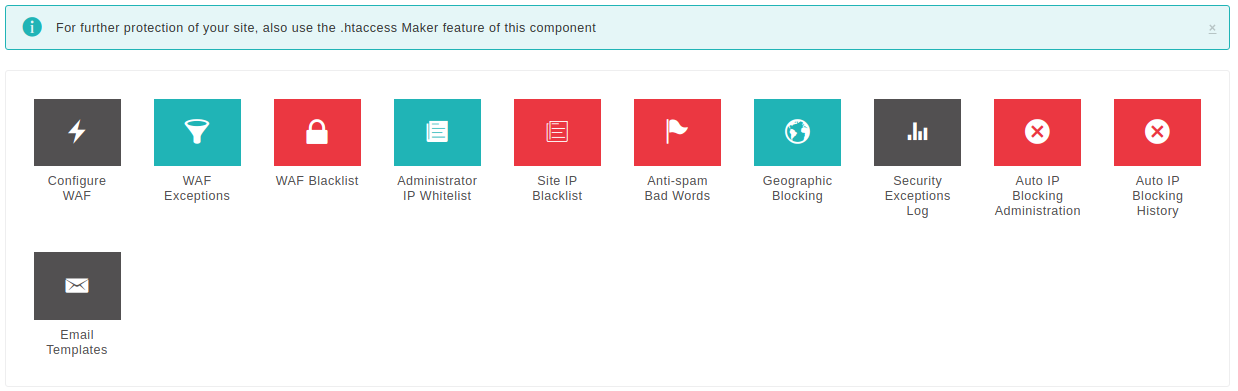
Clicking on any icon will launch the respective sub-tool. The button on the upper right-hand corner will get you back to the Control Panel page.
This sub-tool is where all the configuration fine-tuning of the firewall takes place. By default, none of these options are enabled during installation. You will have to enable them manually. Once you are content with your options click on to save the changes and return to the WAF panel page, or to return without saving.
![[Important]](/media/com_docimport/admonition/important.png) | Important |
|---|---|
|
If you do something wrong and you inadvertently lock yourself out of the administrator area of your site, do not panic! Read this section about regaining entrance. |
The Configure WAF page is split into several tabs (or option groups, if you enabled the Long Configure WAF Page parameter in the component's Options page) to make it easier for you to locate the correct option. The documentation of this page is organized as one section per tab to help you locate the option you are looking for.
WAF: Basic Features
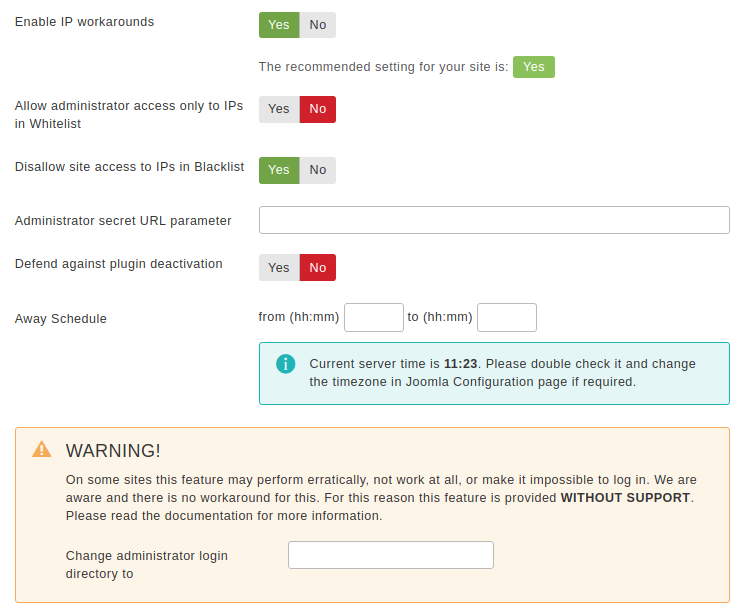
The Basic Features section contains the very basic options which allow you to control who can access your site.
- Enable IP workarounds
-
When this option is disabled (default on new installations) Admin Tools will get the visitor's IP only from the REMOTE_ADDR environment variable sent by your server to PHP. This is the most secure option but may cause a problem on certain sites which have a load balancer, reverse proxy, cache or CDN in front of the web server. In these cases the REMOTE_ADDR contains the IP address of the load balancer, reverse proxy, cache or CDN in front of the web server, NOT the IP address of the visitor. As a result all attacks will appear to be coming from the same IP address. Automatically or manually blocking this IP will disable your site for everyone. Moreover, features like Administrator Exclusive Allow IP List, IP Disallow List and so on will not work properly or at all.
On these setups Admin Tools you can set the Enable IP Workarounds option to Yes. This way Admin Tools can use the X-Forwarded-For HTTP header which is sent by the load balancer, reverse proxy, cache or CDN in front of the web server instead of REMOTE_ADDR. This HTTP header contains the real IP address of the visitor and Admin Tools' IP-based features will work properly.
This option must NOT be enabled on sites which are NOT behind a load balancer, reverse proxy, cache or CDN. If you do that then an attacker can send a X-Forwarded-For HTTP header to mask their IP address or perform a targeted denial of service attack.
If you are unsure about your setup there is a failsafe ways to figure out if you need to enable this feature. First, set it to No. Then wait until there is an attack on your site. Did your site become inaccessible for everyone after the last time Admin Tools detected an attack? Do you always see the same IP or variations of the same in the Blocked Requests Log? If the answer to both questions is "yes" then you must set the "Enable IP workarounds" option to Yes.
- Allow administrator access only to IPs in the Exclusive Allow IP List
-
When enabled, only IPs in the Exclusive Allow IP List (see the following sections of this documentation about configuring it) will be allowed to access the administrator area of the site. All other attempts to access the administrator pages will be redirected to the site's home page. Be careful when using this feature! If you haven't added your own IP to the Exclusive Allow IP List you will get locked out of your administrator area!
Please look into the Exclusive Allow IP List documentation section for more information.
Important IPs added to the Administrator Exclusive Allow IP List are fully vetted as far as Admin Tools is concerned. This means that no security measure will be applied against them. Please place only very well trusted IPs in this list! If an attack is launched from this IP, it will not be blocked by Admin Tools!
- Disallow site access to IPs in the IP Disallow List
-
When enabled, if the visitor's IP is in the IP Disallow List (see the following sections of this documentation about configuring it) they will immediately get a 403 Forbidden error message upon trying to access your site.
- Administrator secret URL parameter
-
Normally, you can access your site's administrator area using a URL similar to
http://www.example.com/administrator. Potential hackers already know that and will try to access your site's administrator area the same way. From that point they can try to brute force their way in (guess your username and password) or simply use the fact that an administrator area exists to deduce that your site is running Joomla! and attack it. By entering a word here, you are required to include it as a URL parameter in order to access your administrator area. For instance, if you enter the word test here you will only be able to access your site's administrator area with a URL similar tohttp://www.example.com/administrator?test. All other attempts to access the administrator area will be redirected to the site's home page. If you do not wish to use this feature, leave this field blank.Important The secret URL parameter must start with a letter. If it starts with a number, you will immediately get a "Illegal variable _files or _env or _get or _post or _cookie or _server or _session or globals passed to script" error when trying to access your site's administrator back-end. It should also contain only lowercase and uppercase ASCII characters and numbers (a-z, A-Z, 0-9), dashes and underscores in order to ensure the widest compatibility with all possible browser and server combinations.
Any other characters you use (such as: punctuation; special characters; Latin letters with accents or diacritics; Greek, Cyrillic, Chinese, Japanese and other ethnic script characters)will have to be URL-encoded. This makes it difficult and tricky to use, hence our recommendation not to use it.
Moreover note that some extended Unicode characters such as certain Traditional Chinese characters and Emoji cannot be used. They will be either rejected by the server or trigger a server protection which will lock you out from your site at the hosting level (you'll have to contact your host to unblock you).
Finally note that on most servers this is case sensitive, i.e. abc, ABC and Abc are three different secret words.
![[Tip]](/media/com_docimport/admonition/tip.png)
Tip Some servers do not work with
http://www.example.com/administrator?testdue to their configuration. You may want to try usinghttp://www.example.com/administrator/?test(add a slash right before the question mark) orhttp://www.example.com/administrator/index.php?test(add /index.php right before the question mark). One of them is bound to work on your server. Unfortunately, there is no way to know which ones will work on your server except for trying them out. The first one (http://www.example.com/administrator?test) works on 95% of servers and that's what we recommend trying out first. - Defend against plugin deactivation
-
When enabled, Admin Tools will prevent back-end users from trying to disable (unpublish) the plugin. This means that you will also be unable to unpublish the plugin until you disable this option!
- Change administrator login directory to
-
THIS FEATURE IS PROVIDED WITHOUT SUPPORT. We had completely removed this feature in version 3.5.0. It was only restored at the insistence of some clients. Since we cannot guarantee its correct operation, we offer no support for it. Please note that many servers are severely misconfigured and will not process the redirection to /administrator correctly. This may cause this feature to perform erratically or even prevent you from logging in to your site. Use at your own risk and keep in mind that NO SUPPORT will be provided for it. We recommend using Administrator Directory Password Protection instead. It's more secure and doesn't cause the problems the "Change administrator login directory" feature does.
As explained in the option above, you can normally access your site's administrator area using a URL similar to
http://www.example.com/administratorwhich is known to hackers with potentially negative consequences. This Admin Tools feature allows you to "cloak" the administrator login URL.It's easier to explain this with an example. Let's say you use the setting
foobarin this Admin Tools option. When someone who is not already logged in to the administrator back-end tries to accesshttp://www.example.com/administratorthey will be redirected to the home page of your site and a blocked request will be logged. When they try to accesshttp://www.example.com/foobarthey will see the administrator login page.A few important notices regarding this feature:
-
It REQUIRES Search Engine Friendly URLs and Use URL Rewriting to be set to
Yesin your Joomla! Global Configuration page. -
You MUST NOT have any menu item with an alias which is the same as this option. If you do you will lose access to that menu item from the front-end of your site.
-
This setting works by setting a session variable. After the first time you visit the cloaked login URL (e.g.
http://www.example.com/foobar) you will then be able to access the regular administrator URL (http://www.example.com/administrator) until your back-end session expires. Session expiration is controlled by the Session Lifetime value you have set in your Joomla! Global Configuration page. This behaviour is not a bug, it is how it is intended to function. -
By using this option you are NOT renaming the administrator directory. Doing so is not supported by Joomla! and its extensions and would lead to grave issues with your site. This feature is a URL manipulation trick, a sort of smoke and mirrors to confuse hackers trying to brute force your administrator login. Even though it's a trick it is a very effective one indeed!
-
You CAN combine it with the Administrator secret URL parameter feature. In this case you need to access the login page as
http://www.example.com/foobar?testwhere "foobar" is the setting of Change administrator login directory to and "test" is the setting of Administrator secret URL parameter.Unlike using the Administrator secret URL parameter on its own you MUST NOT put a slash or /index.php before the question mark even if your server required it before enabling the change administrator login directory option. Remember that what you are accessing is not a real directory on your server, it is merely a URL manipulation trick.
-
You CAN combine it with the Password-protect Administrator feature (assuming that you are using Apache or another server compatible with .htaccess and .htpasswd files). In fact, we suggest that you enable all three administrator login protection features on your site: password-protect administrator, secret URL parameter and change administrator login directory. Combined with two-factor authentication (either Admin Tools' or the one shipped with Joomla! 3.2) you will have a quintuple protection before anyone can access your administrator area. That's paranoia level protection.
-
- Away Schedule
-
By default, Joomla! allows users with back-end access to log in to the site any time of the day. On smaller sites which have only a handful, or even just one, administrators on the same zone this means that someone can try to log in with a stolen username / password while you are fast asleep and unable to respond to the unexpected login. This where the Away Schedule comes into play. If a user with back-end login privileges tries to log in to the front- or back-end of your sute between the "from" and "to" hour of the day they will be denied login. Moreover, if someone tries to access the administrator login page during that time they will be redirected to the front-end of the site – even if the have used the correct Administrator secret URL parameter.
Please note that this feature does not affect your regular users logging in to the front-end of your site. It only prevents users belonging to a group with the
Admin Loginprivilege. You can check which groups have that privilege by clicking on the , menu of your site and visiting the Permissions tab.The From and To time has to to be entered in 24-hour format with trailing zeros, e.g. 09:15 for a quarter past 9 a.m. and 21:30 for half past 9 p.m. The time is entered in your server's timezone which may be different than the timezone you live in. For your convenience, the server's time at the time of the page load (in 24 hour format) is shown to you right below the Away Schedule.
WAF: Request Filtering
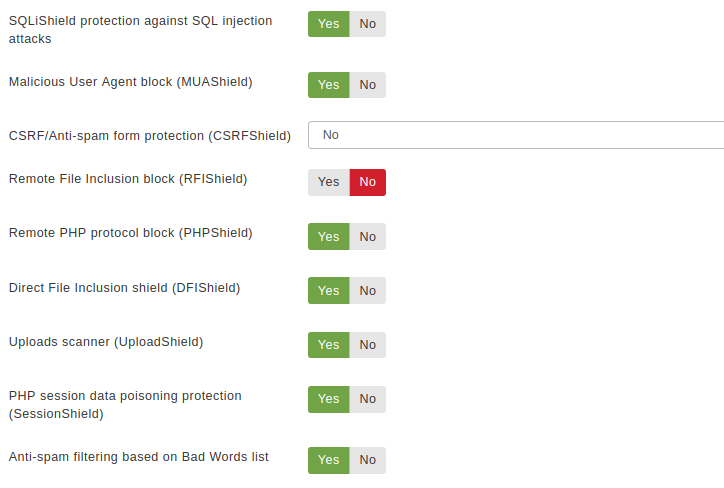
The Request Filtering section contains the options which are the heart and soul of the Web Application Firewall. Admin Tools will monitor incoming requests and their variables, filter them using these options and decide which requests seem to be nefarious, blocking them.
- SQLiShield protection against SQL injection attacks
-
When enabled, Admin Tools will try to detect common SQL injection attacks against your site and block them.
But what is a SQLi attack? A few Joomla extension developers are hobbyists, without experience and / or security training; or mistakes do happen, as Joomla itself has found out the hard way. One of the common mistakes they do is to make assumptions about the nature or the content of user-submitted data, interpolating them into database queries as-is. Database queries are also called SQL queries (SQL, pronounced "sequel", is the shorthand for Structured Query Language, the programming language the database queries are written in). An attacker can exploit this mistake by sending data which have the effect of terminating the developer's database query and starting a new one which either dumps privileged data -such as usernames and passwords- or modifies data into the database - such as adding a new Super User under the control of the attacker. This class of attacks is called an SQL Injection, or SQLi for short, since the attacker "injects" his own code into a SQL query running on the site.
- Malicious User Agent block (MUAShield)
-
Many hackers will try to access your site using a browser configured to send malicious PHP code in its user agent string (a small piece of text used to describe the browser to your server). The idea is that buggy log processing software will parse it and allow the hacker to gain control of your website. When enabled, this feature allows Admin Tools to detect such attacks and block the request.
- Remote File Inclusion block (RFIShield)
-
Some hackers will try to force a vulnerable extension into loading PHP code directly from their server. This is done by passing an http(s):// or ftp:// URL in their request, pointing to their malicious site. When this option is enabled, Admin Tools will look for such cases, try to fetch the remote URL and scan its contents. If it is found to contain PHP code, it will block the request.
Important If your site starts throwing white pages when submitting a URL in your site's front-end, please disable this option. The white page means that your server is not susceptible to this kind of attack and doesn't properly advertise this to Admin Tools when requested. In this case, Admin Tools crashes while trying to scan the contents of the remote location, causing the white page error. Disabling this option in such a case poses no security risk.
- Remote PHP protocol block (PHPShield)
-
Some hackers will try to read the files of your site using the php:// wrapper and some advanced PHP filters. When this option is enabled, Admin Tools will block every request that contains the php:// string.
- Direct File Inclusion shield (DFIShield)
-
Some hackers try to trick vulnerable components into loading arbitrary files. Depending on the vulnerable component, the file will either be output verbatim or parsed as a PHP file. This allows attackers to disclose sensitive information about your site or run malicious code uploaded to your site through another vulnerable vector, e.g. an unfiltered upload of executable PHP code. When this option is enabled, Admin Tools will search the request parameters for anything which looks like a file path. If one is found, it will be scanned. If it is found to contain PHP code, the request will be rejected.
Important This feature does NOT prevent dumping of non-PHP files, e.g. the
/etc/passwdfile of Linux servers. - Uploads scanner (UploadShield)
-
When this option is enabled, Admin Tools will proactively scan all files which are uploaded through Joomla!. If any of these files is found to contain even a single line of PHP code, the request is blocked. This can prevent some kinds of very tricky attacks, like uploading malicious PHP code wrapped inside avatar images. Do note that not all servers support this feature. If the uploaded files directory is blocked by open_basedir restrictions, no scanning will take place. If unsure, ask your host if they have put open_basedir restrictions which block access to the PHP uploads directory. If they answer affirmatively, this Admin Tools feature will not work unless this restriction is lifted.
![[Warning]](/media/com_docimport/admonition/warning.png)
Warning NOT ALL COMPONENTS ALLOW ADMIN TOOLS TO SCAN THEIR UPLOADS! Some components do not use Joomla!'s index.php entry point file. Instead, they use their own. Since these uploads do not pass through the Joomla! application, Admin Tools' code doesn't run and these uploaded files are not scanned. In this case, if that component is found vulnerable, your site will still be at risk. We suggest avoiding such components. How can you tell? It's simple. If you use the front-end protection feature of .htaccess / NginX Configuration Maker and you had to add an exception for a component, it doesn't use Joomla!'s index.php and is potentially vulnerable to this kind of code upload attacks.
Note As of Joomla! 3.4.1, our UploadShield code is included in Joomla! itself and is always enabled. As a result we recommend that our clients keep this feature turned off on Joomla! 3.4.1 and later.
- PHP session data poisoning protection (SessionShield)
-
Prevents malicious input data which can be used to trick PHP's internal session handler into executing arbitrary code when it's restoring the user session.
The PHP session unserializer has a major bug which makes it misinterpret stored session data if they contain specific character combinations, overwriting the legitimate session data with the attacker-defined contents. Combined with some other features of PHP this can lead to the execution of arbitrary PHP code. In short, attackers can send malicious data in one page load and get arbitrary code to execute in the next page load. This feature of Admin Tools detects and blocks this kind of malicious data. CAUTION: It may block some legitimate requests as well.
Warning This attack vector is NOT unique to Joomla!. It is a low level PHP bug / vulnerability which was fixed only in PHP 5.5.4 and later versions. Furthermore, default PHP settings even in newer versions of PHP use the old, vulnerable setting, putting all sites using session data at risk! We VERY STRONGLY recommend that all our clients use PHP 5.5.4 or later and edit their php.ini to modify this line:
session.serialize_handler = php
to
session.serialize_handler = php_serializeThis is the ONLY guaranteed way to fix this low level PHP vulnerability across all possible attack vectors, including those yet undiscovered.
- Anti-spam filtering based on Bad Words list
-
When enabled, all requests containing at least one word in the Bad Words list (configured separately, see the next sessions) will be blocked. By default the Bad Words list is empty; you have to configure it to match your site's needs. One good idea is to include pharmaceutical, luxury watches and shoes brand names, as this makes up the majority of comment and contact spam received on web sites.
- Allowed domains
-
Enter a comma-separated list of the fully qualified domain names your site can be accessed on. DO NOT enter http:// or https:// in front, do NOT enter the / after the domain name or the path that follows it. This is a domain name, not a URL. For example:
example.com, example.net,
                example.org
. You do not need to enter the www/non-www versions of the domain names or domain names which resolve to the localhost IP address (127.0.0.1 for IPv4 or ::1 for IPv6). If an attacker tries to access your site with an HTTP Host header that does not match these domain names (or their www/non-www versions) they will receive an HTTP 400 Bad Request error message.This feature mitigates a class of attacks called “HTTP Host spoofing” which affects a stark minority of servers, mostly servers which were set up by someone who doesn't understand web server security enough or at all. On those servers you can send an HTTP Host header which confuses the server into believing that this is the domain name it's running on. So, even though you are accessing a site on www.example.com you can send it a
Host: www.evil.hackHTTP header and now all URLs generated by the server will use the www.evil.hack domain name. This is used in phishing attacks to misdirect a submitted form with login credentials to a server under the attacker's control even though the browser's address bar shows a legitimate domain name.If you are on an affected server you are VERY STRONGLY recommended to use this feature INSTEAD OF setting the $live_site URL in configuration.php, the latter being the traditional but incorrect way of mitigating such an issue. Setting the $live_site URL limits your site to exactly one domain name (remember that example.com and www.example.com are two different domain names!) and protocol (HTTP vs HTTPS). Therefore using $live_site is extremely limiting and can cause your site to stop working if you try to enable/disable HTTPS everywhere in Joomla's Global Configuration, enable/disable www to non-www redirections etc. Moreover, the $live_site URL in configuration.php does NOT protect against all host spoofing attacks. What Admin Tools does will indeed protect all requests handled by Joomla against such attacks without causing any of the adverse effects of Joomla's recommended course of action.
WAF: Hardening Options
With the Hardening Options section you are able to harden the way some basic Joomla! features work. These are advanced settings, so please make sure you understand what each option does before you enable it.
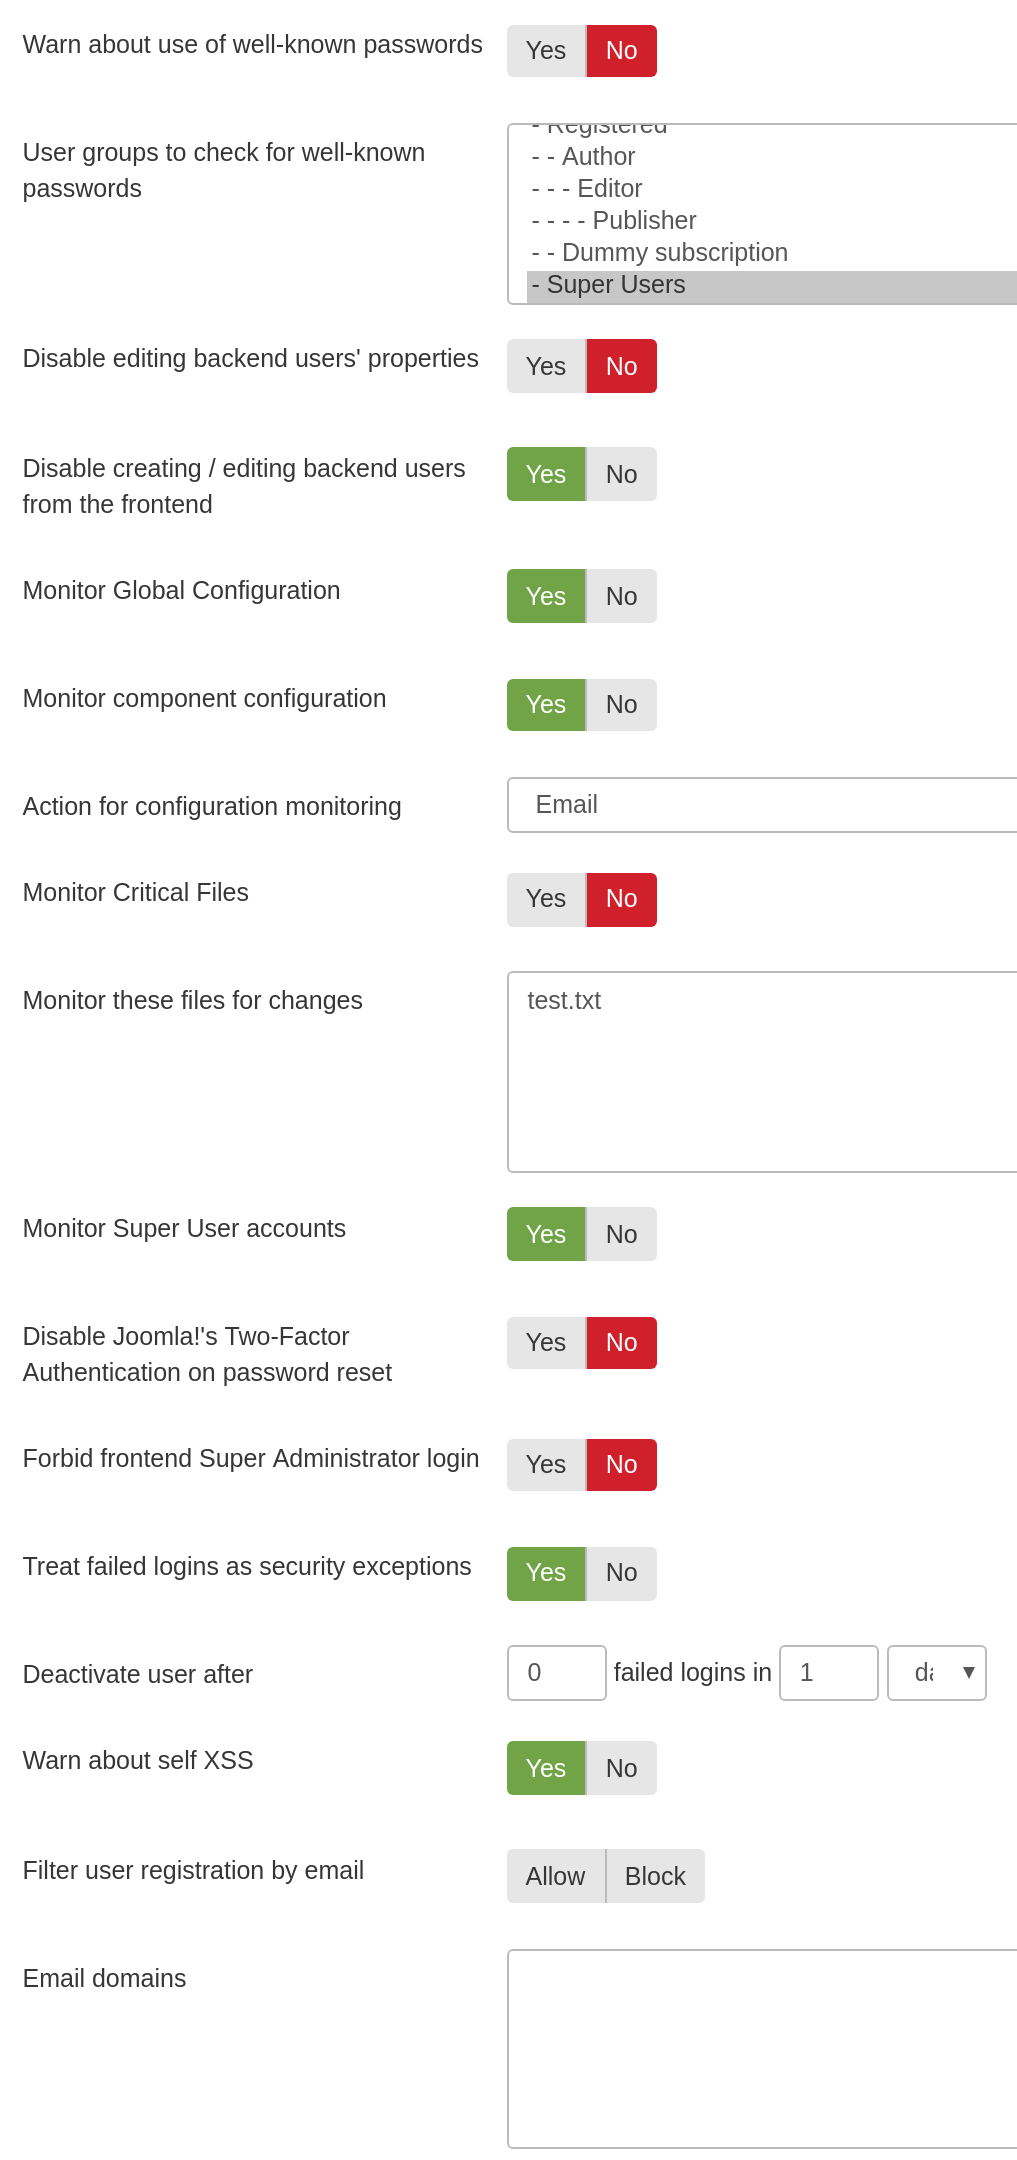
- Warn about use of well-known passwords
-
When this option is enabled, Admin Tools will connect to the Have I Been Pwned database and check if the hash of the current password is known. If a match is found, the user will be blocked from using an insecure password.
Wait, are you sharing my password? Is that service secure? First of all, we do not share your password. We're only sending a fraction (only first 5 chars) of the hash of your password. This method is called k-anonymity and it's a very secure way to share sensitive date anonymously. So, don't worry, your password is secure, if you want to read the whole details of this implementation, you can take a look at this page.
Regarding the external service, it is powered by two well known figures: Troy Hunt (a security research) and CloudFlare (leader in Content Deliver System services).
- User groups to check for well-known passwords
-
Most likely you want to enable this feature only for specific groups: Admin Tools will check for well-known passwords only users belonging to those groups (default to Super Users)
- Disable editing backend users' properties
-
When enabled, trying to modify the settings of an existing or create a new Manager, Administrator or Super User will fail.
- Disable creating / editing backend users from the frontend
-
You should normally be unable to create a new user with administrative backend login privileges from the public frontend. When this option is enabled it will treat attempts to create this kind of accounts as hacking attempts and block them from executing. This addresses some of the most notorious zero day attacks in Joomla! which took place between 2015 and 2016 and we recommend having it turned on at all times. If you need to disable it we STRONGLY recommend rethinking whatever leads you to disable this setting because it's creating a gaping security hole on your site.
- Monitor Global Configuration
-
When this is enabled and someone tries to change the Global Configuration of Joomla!, either from the back-end or the front-end, you will either be notified or they will get blocked (depending on your settings below). This feature is designed to protect you against sly hackers or malicious administrators who subtly change your site's configuration for nefarious purposes, e.g. by elevating the global privileges of user groups.
- Monitor component configuration
-
When this is enabled and someone tries to change the configuration of any core Joomla! or third party component (what you see when you click Options in a component's toolbar) from the back-end of your site you will either be notified or they will get blocked (depending on your settings below). This feature is designed to protect you against sly hackers or malicious administrators who subtly change your components' configuration for nefarious purposes, e.g. by elevating the privileges of user groups with regards to a particular component.
- Action for configuration monitoring
-
This option works in conjunction with the two above. You define what do you want to do when either global or component configuration is enabled and a change is detected in the configuration.
-
Email will simply send a warning email to the email addresses you've configured to receive emails for blocked requests and only if you have configured such email addresses. The changes in configuration will go through. This is the recommended setting for most sites.
-
Block will treat any such changes as a reason to block the request. The changes in configuration will NOT go through. This setting should only be used on "locked down" sites where configuration changes are not expected (or will only be performed by an administrator who has adequate access to modify Admin Tools' configuration).
-
- Monitor Critical Files
-
Critical files commonly modified by hackers (index.php, administrator/index.php and the index.php, error.php and component.php of all templates installed on the site) will be monitored for changes on every page load. If a change is detected you will be notified by email. This usually lets you get an ahead warning in case of a successful hacking attempt.
Admin Tools checks these files every time your site loads a page. The size of the file, the file's last modification date, the MD5 checksum of the file's contents and the SHA-1 checksum of the file's contents are calculated by PHP and compared against the information stored in the database table #__admintools_storage (where #__ is the common table name prefix of your site, as defined in your site's
configuration.phpfile), in the row with the keycriticalfiles. If any of this information has changed since the last request to your site, Admin Tools considers the file changed and triggers an email to you about changed files. Every time a change is detected the aforementioned information for each file is updated in the #__admintools_storage database table. This way you will not get any further e-mails about the changed file unless it changes once again.It is possible for an external application or process to modify these files, then restore them back to their previous state — including the last modified date. If a request to your site takes place while any of these files is in a modified state you will receive an email. This may be perceived as a “false positive” because by the time you check your site again the change has been reverted. This is NOT a false positive, something really DID change. Admin Tools deliberately sends you an email because this is something which can also happen during a legitimate attack: the attacker modifies one of these files to gain access to your site, then covers up their tracks by restoring the file to its previous state.
It is also possible to receive an email if someone or something modifies the #__admintools_storage database table row. In this case the contents of the database table may not reflect the files currently on the server's filesystem. As a result, Admin Tools perceives the files as changed. For example, this may happen if the host automatically rolled back the state of your database or when you restore a database-only backup / SQL dump of your database.
Finally, you will most likely receive this kind of email after updating the Joomla version on your site, after updating your site's template, and after updating the Global Configuration of your site — even if this happens automatically without your interaction. In both cases some of the critical files have changed. When you update Joomla its
index.phpfiles are changed. When you update your template itsindex.php,error.phpandcomponent.phpfiles are changed. When you save your site's Global Configuration —or a third party extension or external software updates your site's Global Configuration— theconfiguration.phpfile is changed. These are expected changes. If they happen without your knowledge you should track down what is causing them and decide whether it's acceptable behaviour or not. - Monitor these files for changes
-
Monitor the following files (one per line) for changes. If a change is detected you will be notified by email.
- Monitor Super User accounts
-
Admin Tools will keep track of the user accounts with Super User access. If a new Super User is added outside of Joomla's Users page you will be notified by email. Moreover, the detected new Super User accounts will be automatically blocked. The idea is that these Super Users are most likely create as the result of a hack or rogue code.
Please note that users created or added by other Super Users in the backend of the site using Joomla's Users page will NOT be blocked by this feature. If you wish to disable this please use the Disable editing backend users' properties feature.
- Disable Joomla!'s Two-Factor Authentication on password reset
-
When enabled, Admin Tools will disable the Joomla! Two Factor Authentication configuration for a user when they are resetting their password.
Joomla! 3.2 or later allows every user of the site to enable Two Factor Authentication (TFA) for their user account. In case the user misplace their TFA device or is otherwise unable to use TFA they are given emergency one time passwords. However, many people forget to note them down or do not understand how to use them. Every time they cannot use TFA they have to contact an administrator of the site to disable TFA on their account. Even worse, when the user is an Administrator themselves they have no way to disable TFA without renaming files – and knowing which files to rename. This is where this Admin Tools feature comes in handy.
The workflow is the following: The locked out user starts by using the "Forgot your password?" link in Joomla! to request a password reset. The receive an email with instructions. They follow the link which takes them back to the site where they enter their username and the password reset authorisation code found in the email. Now they enter their new password. When the password changes, the "Disable Joomla!'s Two-Factor Authentication on password reset" feature of Admin Tools kicks in and disables Two Factor Authentication on this user's account. The user can now log in to the site using just their username and password.
Important Please remember that this only applies to the two factor authentication feature built in Joomla! 3.2 or later.
- Forbid front-end Super Administrator login
-
When enabled, it will not be possible for Super Administrators to log in to your site's front-end. This is a security precaution against password brute forcing. One common method is an attacker trying to login to the front-end of your site as a Super Administrator, trying different password until he finds the correct one. When this option is enabled, he will not be able to log in as a Super Administrator in the front-end of the site, crippling this brute forcing method of determining the Super Administrator password.
- Treat failed logins as a reason for blocking the request
-
When enabled, failed login attempts of any kind of user (even simple registered users) count as a reason to block the request and are being logged in Admin Tools' Blocked Requests Log. There is a very useful implication to that. Since they count as security blocked requests they count towards the limit you set up in the automatic IP blocking. Therefore, after a number of failed login attempts, the user's IP will be automatically blocked for the duration you have set up.
- Deactivate user after
-
Admin Tools can optionally deactivate existing user accounts when there are multiple failed attempts to log in using their username, protecting user accounts from brute force attacks. In here you can specify the number of failed logins and the time period these have to occur before the user is deactivated, e.g. 3 failed logins in 1 minute.
In order for this feature to work you must have enabled the Treat failed logins as a reason for blocking the request option above and NOT include
Login
                failure
in the Do not log these reasons option in the Logging And Reporting area of this configuration page.The behaviour of this feature depends on the user registration setup of your site, as defined in , , in your site's back-end. When Allow User Registration is set to
Nothis Admin Tools feature does not do anything at all! When Allow User Registration is set toYesthere are three possible behaviours depending on the setting of the New User Account Activation option:-
Self: The user is deactivated and an activation email is sent to them by Admin Tools using theUser re-activationemail template. -
Admin: The user is deactivated and an activation email is sent to all of your site's Super Users by Admin Tools using theUser re-activationemail template. -
None: This Admin Tools feature does absolutely nothing at all. The user is not deactivated.
-
- Warn about self XSS
-
Display a message in browser console to warn the user to avoid running any command inside it. This can lead to hacking yourself (a.k.a. Self XSS attacks) and steal your account data.
- Filter user registration by email
-
Admin Tools can block user registration based on the email domain they are using (listed in the field below):
-
Allow Will allow registration only if the email domain is contained inside the list. A typical use case is to allow registration only from site company addresses or student of a campus
-
Block Registration will be blocked if the user tries to use a domain contain in the list. This is usually useful if you want to block people from using temporary or disposable email accounts.
-
- Email domains
-
Enter one domain for each line, leave empty to disable the filter during user registration
Below that you will find the Forgotten backend users section. This feature lets you automatically block or force a password reset for users with backend access who have not logged into the site for a very long time. This feature was inspired by a tweet by Jeff Atwood (of DIscourse fame) and our observations by logging into real world sites when our clients request us to do so.
The idea is that privileged user accounts who have not logged into the site for a very long time are probably left over user accounts the site owner forgot to disable when the person stopped having a reason to log into the site's administrator backend. The password of the forgotten user account may have been compromised in the meantime. For example, the user may have reused their password on a different site which got hacked; or they may had used an easy to guess password. If Two Factor Authentication isn't enabled on the account, an attacker who has successfully compromised the password could now log into your site. Since they are using a legitimate user account they do not get their request blocked and they have full access to your site with everything that entails about your site's integrity.
This Admin Tools feature is designed to prevent this kind of awkward situation. If a user with backend access has not logged in for the configured time period (default: 90 days) they will either be completely blocked from accessing the site or they will be forced to reset their password (default and recommended action). In the first case only another Super User can unblock them, by editing their user account. In the latter case the user will try to log in and Joomla! will immediately force them to reset their password. Password reset requires providing information sent by email. This way an attacker cannot use a compromised password; they cannot read the email sent to the legitimate account holder's email address, therefore they cannot reset the password and log into your site.
For even better protection of your site we recommend that you take two more optional steps. Make sure that all privileged users have Two Factor Authentication set up on their user account. Joomla has Two Factor Authentication built in. Alternatively, you can use our more thorough, free of charge Akeeba LoginGuard extension to provide Two Step Verification (it also lets you force certain user groups to enable it). Moreover, it is recommended to have inactive user accounts automatically deleted. This can be done, for example, with our free of charge Akeeba DataCompliance component for Joomla! (however, it will not delete Super User accounts by default to prevent any accidents -- deletion through Akeeba DataCompliance is irreversible by design as it implements the GDPR requirements of Data Minimization and the Right To Be Forgotten).
The following options are available for this feature:
- Prevent forgotten backend users from logging in
-
Should this feature be enabled at all?
- Check every [minutes]
-
For performance reasons, this feature only runs periodically, checking which backend user accounts are inactive and disabling / forcing a password reset on them. Here you can define how often it will run. The default is 60 minutes which means that it will run at most once every 60 minutes. Other useful values are 1440 (at most once a day) and 10080 (at most once a week).
- Backend user groups
-
Which user groups this feature should apply to? We recommend choosing at the very least the Administrator and Super User groups. If you have other user groups with backend login we recommend you add them as well.
If you do not specify any groups, or choose the "Show All Groups" option, Admin Tools will consider users from all user groups which have the Admin Login privilege, as set up in the Global Configuration of your site.
Even though you can select user groups without backend access they are NOT taken into account. The user groups list is rendered by Joomla! and it does not provide a way to remove user groups which lack backend access.
- Maximum number of days since last login
-
Users who have not logged into the site for at least this many days will be blocked or forced to reset their password. The default is 90 days (three months). Reasonable values are between 30 and 365 days. If you set this to 0 or leave this blank the feature will effectively be disabled.
- Login prevention method
-
What should Admin Tools do with the user accounts which have not logged in for a long time?
Block means that the user will be completely blocked from accessing the site. This is implemented by setting the Block User to Yes. The blocked users cannot unblock themselves. A Super User will have to do that by editing the user from the Joomla backend Users, Manage menu item.
Force Password Reset is the recommended and selected by default method. In this case the user account is allowed to log in but they will have to immediately reset their password and log back in before they can do anything on the site. The password reset takes place through Joomla's built in password reset method. It is NOT handled by Admin Tools.
- Protected users
-
Any users you select here are not going to be prevented from logging into the site. We recommend that you add the site owner here. Moreover, if you are building a site for a client, you should add your user account as well. This will let you log into the site to provide technical assistant should your client require it.
It is worth noting that if Login prevention method is set to Block and Protected Users is empty Admin Tools will NOT block ANY Super Users, even if they haven't logged in for a time period longer than the specified maximum number of days. This is a precaution against losing all access to the site by accident (if all Super Users get blocked then nobody is left to unblock you). If you have a site with multiple Super Users and use the Block method you MUST specify at least one Protected User for Admin Tools to provide a sensible level of protection against forgotten user accounts.
WAF: Cloaking
The next section is called Cloaking and contains options to allow you to modify the way several features in Joomla! which are frequently exploited by attackers to locate Joomla! sites work. The idea is that potential attackers use automated tools to scan thousands of sites, trying to identify which of them run Joomla! in order to attack them. Using these options will allow you to "cloak" your site against such fingerprinting (scanning) attacks.
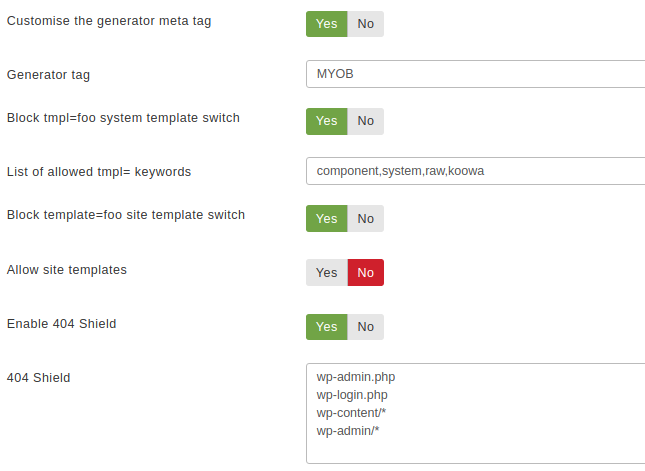
- Hide/customise generator meta tag
-
All Joomla! installations set the meta generator tag, a piece of HTML in the header of all pages, to advertise the fact that your site is running on Joomla!. This information is cached by search engines and is exploited by attackers to deduce that your site is running Joomla! when looking for potential targets. Disabling the generator tag normally requires modifying Joomla! core files. Instead, you can enable this option and enter a custom value for the generator tag in the next option. Be inventive! Use something silly, like "A million monkeys with typewriters" or cloud the water by assigning the name of another CMS, like "Drupal" or "WordPress".
- Generator tag
-
When the previous option is enabled, this is what the generator meta tag's value will be.
- Block tmpl=foo system template switch
-
One of the lesser known Joomla! features are its system templates. The value of the tmpl keyword tells Joomla which .php file in the template's folder it will use to render the page. For example,
?tmpl=componenttells Joomla to use the component.php file which renders only the component output, without any modules, menus or other embellishments on the page. Of and by itself this feature is not dangerous. However, hackers have realized that this feature is being abused by badly architectured plugins and components beyond the intended purpose in Joomla itself. This badly constructed third party software expects non-standard values in the tmpl keyword to do something specific, e.g. handle AJAX requests, update a shopping cart etc. The downside is that depending on how this is implemented it may open a security hole, e.g. if the code parsing the tmpl keyword in a third party extension gets confused by certain types of data and executes arbitrary code or does something unintended. For this reason Admin Tools has the Block tmpl=foo system template switch feature which will block any request that does not have one of the expected tmpl keywords for your site. - List of allowed tmpl= keywords
-
The list of tmpl keywords which should be allowed of your site, as a comma separated list. At the very least you MUST include system and component, otherwise Joomla! will not work properly. Default value:
component,system,raw,koowa,cartupdateThe component, system and raw keywords are defined and used by Joomla itself. tmpl=component tells Joomla to only show the component output, without any modules, menus or other embellishments – however, the template's CSS files are loaded. tmpl=raw has a similar effect to tmpl=component, without loading the template's CSS files at all. tmpl=system is used for displaying error pages. Your site will NOT work properly if you remove any of these keywords from the list of allowed tmpl keywords.
Note The koowa keyword is only required when you run components based on Nooku Framework a.k.a. Koowa, for example DOCman. According to the Koowa developers' email we received on January 2015 there are two reasons for the use of the koowa keyword:
-
The modals which contain full page JavaScript "applications", like the multi file uploader, was breaking on some templates out there because they do weird stuff in their JavaScript. No matter the precautions taken by Koowa there is at least one template out there removing the JavaScript files from the page output because they "looked like JavaScript".
-
Frontend edit forms. The Koowa developers also had a lot of problems by using tmpl=component or the normal template in frontend forms. Templates re-define Bootstrap rules, use Bootstrap 3, add weird JavaScript to "enhance" the page that has no job in the component output and so on.
So, basically, they added the custom "koowa" tmpl keyword to work around restrictions imposed by templates. The correct solution would be using tmpl=raw&format=raw but they decided otherwise. Therefore we include this keyword by default. If you are not using any extension powered by Koowa you are advised to remove that keyword from your site.
Note The cartupdate keyword is currently only used by VirtueMart. For some strange reason its developer does not want to use format=raw for cart updates even though this is the recommended, tried and tested way to do this since Joomla! 1.5. Having had the past experience of trying to discuss best practices with him to no avail we decided to add this keyword by default without even contacting him to propose an alternative. If you are not using VirtueMart please remove this keyword from your site.
-
- Block template=foo site template switch
-
Another Joomla! hidden feature is the ability to switch between installed templates by passing a special URL parameter called "template". Enabling this option will turn off this hidden Joomla! feature.
- Allow site templates
-
Enabling this option partially overrides the previous option (the blocking of template=foo in the URL). If the template= URL query parameter specifies the name of a template which exists in your template directory, then it will be allowed without the request being blocked.
Important If you are using the "Send this page by email" icon in your articles and/or multiple templates on your site, you MUST enable this option.
You MUST enable this option if you want your site visitors to be able to use Joomla!'s com_mailto component, i.e. the "Send this page by email" icon in your articles.
Moreover, you must use it on sites which are using more than one template at the same time. What we mean by that is that you can go to Joomla!'s back-end, go to Extensions, Templates and assign any of the installed templates to any number of menu items. When you do that, several components need to append template=
yourDefaultTemplateNameto the URL. This would cause your site to block the request. By enabling this option you prevent these requests from being accidentally blocked. - Enable 404 Shield
-
Whether the 404 Shield feature should be enabled or not.
- 404Shield
-
This feature 404 will block irregular "Page not found" requests which typically indicate that your site is being targeted by an automatic vulnerability scanner or hacking tool. For example, someone trying to access the folder
wp-adminon your Joomla site is irregular since that folder is the administration area of WordPress. Since your site is running Joomla it means that the request to your site was very likely malicious, e.g. an automated tool (bot) trying to guess your access credentials by trying various common combinations of usernames and passwords. In this light, the request has to be blocked.The default list of URLs to be blocked by 404Shield consists of known WordPress-only paths. That's because we know that these URLs cannot be found on a Joomla site and are typically used by automated hacking tools, therefore minimising the possibility of false positives. You can always add more if you want to.
WAF: Project Honeypot
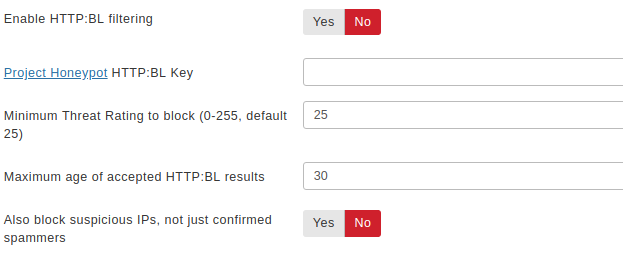
Project Honeypot allows you to integrate with Project Honeypot's spam fighting services. Project Honeypot is a collective effort to detect spammers, email harversters and crackers. Its HTTP:BL service allows participants to query the IP addresses of their visitors and figure out if it is a malicious user behind it. If you enable this feature, Admin Tools will check the IP address of each visitor and, if it is a malicious user, it will block him. You have the following options:
- Enable HTTP:BL filtering
-
Turns the entire feature on and off
- Project Honeypot HTTP:BL key
-
Enter your HTTP:BL key. You can sign up for Project Honeypot and get your key at http://www.projecthoneypot.org/httpbl_configure.php.
- Minimum Threat Rating to block (0-255, default 25)
-
Project Honeypot uses a logarithmic "threat rating" to rank the possibility of a specific IP being a spammer. This options defines the minimum threat level an IP must have before it's blocked. A value of 25 means that this IP has submitted 100 spam messages on Project Honeypot's spam catching honeypots and is usually a safe indication that it belongs to a spammer. Do note that the rating is logarithmic. A value of 50 means 1,000 spam messages and a value of 75 means one million spam messages. Do not set it to values over 50, as you will most likely never block any spammer at all.
- Maximum age of accepted HTTP:BL results
-
Project Honeypot reports when was the last time this IP was caught sending spam messages. The older this is (the higher the age is), the less likely is that this IP is still used by a spammer. You can chose here what will be the maximum reported age that will be blocked. The default value of 30 means that IPs which have submitted a spam message in the last 30 days will be blocked.
- Also block suspicious IPs, not just confirmed spammers
-
Sometimes Project Honeypot is not sure if an IP belongs to a spammer or it's a hapless chap who clicked on the wrong link. In this case the IP is marked as "suspicious". The default behaviour is to not block these IPs. However, if you are receiving a lot of spam it's a good idea to enable this feature and block even "suspicious" IPs. Ultimately, some unfortunate users will be inadvertently blocked, so use this option with caution!
WAF: Exceptions

Sometimes you do not want to block certain IPs or domain names. For example, you don't want to block Google Bot, MSN (Bing) Bot and so on. You can easily add Exceptions from blocking. You can set the following options to prevent Admin Tools from blocking certain IPs and domain names:
- Never block these IPs
-
Enter a comma-separated list of IPs which should never be automatically blocked. For example, such a list can be
127.0.0.1, 123.124.125.126Moreover, since Admin Tools 2.2.a3 you can use IP ranges (e.g.127.0.0.1-127.0.0.10), implied IP range notation (127.0.0.for the entire 127.0.0.1 to 127.0.0.255 block) and CIDR block notation (e.g.127.0.0.0/8) on top of plain old IP addresses.This field fully supports both IPv4 and IPv6 addresses.
You may enter a dynamic IP domain name prefixed by the at-sign (for IPv4) or hash-sign (for IPv6). This only applies if you are using a dynamic IP address domain provider (e.g. DynDNS). For example, if you are using DynDNS and your dynamic IP address domain name is example.dyndns.info and resolves to an IPv4 address you can enter
@example.dyndns.infoto always allow your dynamic IPv4 address. Conversely, if your dynamic hostanem resolves to an IPv6 address you can enter#example.dyndns.infoto always allow your dynamic IPv4 address. Be careful to enter the correct domain name or you may have a delay of up to 30" processing blocked requests.The default setting is a list of IP addresses for the DuckDuckGo indexing bot: 20.191.45.212, 23.21.227.69, 40.88.21.235, 50.16.241.113, 50.16.241.114, 50.16.241.117, 50.16.247.234, 52.5.190.19, 52.204.97.54, 54.197.234.188, 54.208.100.253, 54.208.102.37, 107.21.1.8
Tip If you are using the Exclusive Allow IP List feature to allow access to the administrator section of your site only to specific IPs, these IPs are automatically added to the safe list of IPs which should never be automatically blocked. You do not have to enter them here.
Important IPs added to this list are fully white-listed. This means that no security measure will be applied against them. Please place only very well trusted IPs in this list! If an attack is launched from this IP, it will not be blocked by Admin Tools!
- Allowed domains
-
If the IP address of the visitor whose request would be blocked resolves to a domain name ending in what you enter here they will not be blocked. Effectively, these domain names have a free pass on your site.
Warning Malicious URLs from these domain names WILL be blocked but a. this will not be logged and b. their IP address will not be automatically blocked by the "Auto-ban Repeat Offenders" feature below. This is done to protect your site against reflected search engine attacks. Let us explain this.
Some hackers try to exploit search engines' eagerness to scan URLs, crafting malicious URLs to your site and putting them on their own sites. Search engines will see them and try to visit them on your site. You are explicitly allowing these search engines as you don't want to lock them out of your site. If the malicious URL wasn't blocked just because the request comes from a seemingly innocent source your site would be instantly hacked. That's why the malicious URLs are still blocked, just not logged or cause IP addresses to be automatically banned.
Enter a comma separated list of the domain names you want to allow. The default value is
.crawl.baidu.com,
                .crawl.baidu.jp, .google.com, .googlebot.com, .search.msn.com,
                .crawl.yahoo.net, .yandex.ru, .yandex.net, .yandex.com
which allows the search engine indexers for Baidu, Google, Bing, Yahoo and Yandex.
WAF: Auto-ban
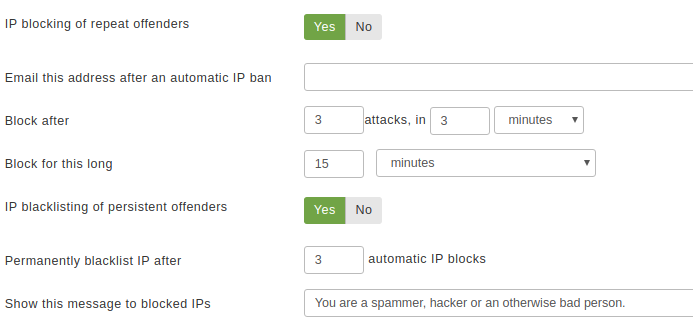
You can easily Auto-ban. This feature allows you to automatically ban IPs which get repeatedly blocked. This can be prove to be an effective measure against malicious users who try to probe your site for vulnerabilities. You MUST enable logging of blocked requests for this feature to work. You can set the following options to define how Admin Tools will behave in those cases:
- IP blocking of repeat offenders
-
When set to yes, the IP address of repeat offenders will be automatically banned based on the rest of the settings
- Email this address if an IP is auto banned
-
Admin Tools can optionally send you an email when an IP is automatically banned, to the email address entered in this field. This will allow you, for example, to determine if some IP is being regularly blocked, in which case it may be a good idea to place it in the permanent IP black list. Leave this field empty (default) to disable this feature.
The contents of the e-mails can be configured using the Email Templates feature in the Web Application Firewall page.
- Block after
-
Chose how many attacks have to happen within how much time. For example, if you set it to 3 attacks in 1 hour, Admin Tools will ban a IP address from which at least 3 attacks have been blocked within the last hour.
- Block for this long
-
How long the block will last. For example, setting it to 1 day will block all access from this IP address for a whole day.
- Permanently disallow IP after
-
If an IP triggers this many auto-bans it will be permanently banned (added to the IP Disallow List) if they are about to be auto-banned again. Make sure that you turn on the IP Disallow List feature by setting "Disallow site access to IPs in the IP Disallow List" to Yes, otherwise permanently disallowing IPs will have no effect.
- Show this message to blocked IPs
-
Allows you to show a specific message to blocked IP addresses. You may want to explain to the user that his IP was blocked because suspicious activity was detected as originating from his IP address.
You can use the special text
[IP]in all capital letters, without spaces between the brackets and IP, to display the user's IP in the message. This may be useful if someone gets accidentally blocked and asks you to help them.
WAF: Logging & reporting
In the Logging and reporting section you can change the way Admin Tools logs and reports various activity items and blocked requests on your site.
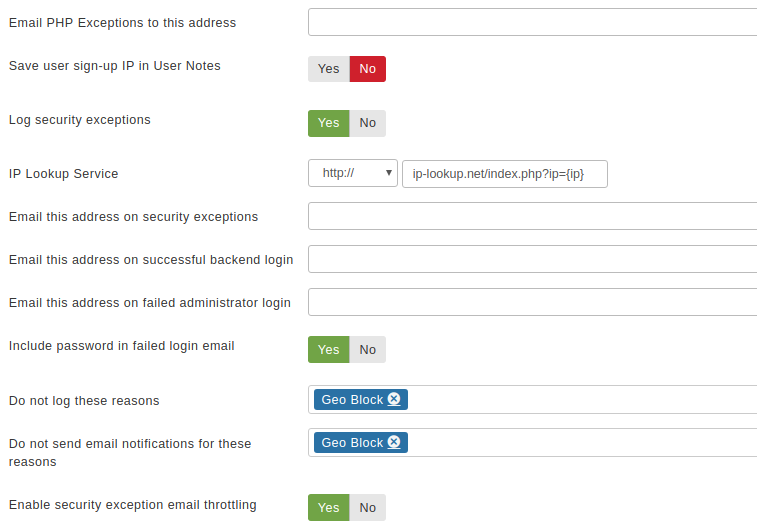
- Email PHP Exceptions to this address
-
Whenever an unhandled PHP exception is raised (ie an error on a database query), Admin Tools will send an email containing all the details (time, file and line raising the exception) for later debugging.
PHP is a language which can throw Exceptions when an error condition, in PHP itself or code written in the PHP language, is encountered. Exceptions are concise information carriers, describing the error condition, where it happened and how the execution got to that point. They allow developers to handle expected error conditions when “caught” by software written in PHP.
In the context of Joomla software, sometimes an exception is thrown that the code does not anticipate. These uncaught exceptions start “bubbling up” the execution layers. If they are not caught by any third party extension or Joomla itself they are ultimately caught by Joomla’s catch–all exception handler code. When this catch–all is triggered your site displays an error page. The problem is that unless you bump into the exact same conditions yourself or a visitor of your site notifies you, you will be completely unaware that this happened.
Admin Tools’ “Email PHP Exceptions to this address” feature installs an auxiliary exception handler which sits right before Joomla’s catch–all one. When an unhandled exception in core Joomla or third party extension code occurs and is not handled by the third party extension or Joomla itself our auxiliary exception handler is triggered. In this case it sends you an email with the information of a PHP exception which is about to cause an error page to be displayed on your site. It then re–throws the exception, letting Joomla display its error page; it can’t do anything else as at this point there is no way to gracefully handle this error condition.
This Admin Tools feature is meant to be used by experienced developers for troubleshooting their site. Receiving an email with an uncaught exception DOES NOT mean that Admin Tools itself caused the error. In fact, it’s meant to report errors happening in third party extensions and Joomla itself. These lie outside the scope of our support, therefore we cannot provide any kind of assistance when you receive such an email.
In an effort to facilitate your troubleshooting, the email Admin Tools sends you includes information which are adequate for an experienced developer to start troubleshooting your site, including the exception type, exception code, error message, file and line where the error occurred, execution debug backtrace, PHP request data, PHP environment information and Joomla session data. This is an accurate snapshot of the Joomla application state at the time the email was sent.
- Save user sign-up IP in User Notes
-
When enabled, the IP new users signed up from will be stored as User Notes.
Important This feature is guaranteed to work only when a user registers to your site using the front-end user registration form provided by Joomla!. Users created through the back-end will not have their IP saved as a User Note because it makes no sense to do so (it's an administrator registering the user account on their behalf). Third party components creating new user accounts may also not trigger the plugin event.
- Log blocked requests
-
It is suggested to keep this option enabled. When enabled, all potential security issues —blocked by Admin Tools— will be logged in the database and made available under the tool. This is required for the automatic IP blocking feature to work.
Please note that turning off this feature will also disable the debug log file, even if the option below is set to Yes.
Important When this option is turned off the automatic IP blocking of repeat offenders, automatic adding of IPs to the IP Disallow List and most email notification features will be deactivated.
- Keep a debug log file
-
It is suggested to keep this option disabled unless you are troubleshooting.
When enabled, Admin Tools will create a file named
admintools_breaches.phpin your site'sadministrator/logsdirectory (or wherever you have configured your logs directory to be). This contains all the information sent in the request that Admin Tools blocked. This may include sensitive information such as usernames, passwords and personally identifiable information. For this reason you must only enable this feature for a limited amount of time when troubleshooting. We may ask you to do this, and send us a copy of the log file, if you ask us for support.When you disable that option, the existing log files will be removed once you visit Admin Tools' Control Panel page again.
Do note that your logs directory MUST be writable for the log file to be generated.
Important Some servers use automated file scanners which will mistakenly flag Admin Tools' log file as a security threat. Because of that they might issue an automated warning to you that your site is hacked, rename / delete the file or prevent web access to your site (put it offline). This is a mistake and does not reflect the truth. Our log file does have an executable extension (.php) and does contain the signatures of hacking attempts (the hacking attempts it stopped from hacking your site!) BUT the hacking attempts signature themselves are NOT executable. In fact, the only reason this is a .php file is so that we can put a PHP die() statement at the top of the file to prevent it from being executable over the web. This information is also printed at the top of the file, in its header. If your host is giving you grief about the log file please show them this documentation page or ask them to actually review the file and read its header. If they still insist that they have to block your site please go to a different host that understands how PHP works and, by extent, is a much safer choice. In the meantime, just disable the Keep a debug log file option.
Important By default the Joomla!
logdirectory is readable over the web. We VERY STRONGLY advise you to either choose a log directory outside your web root or protect this directory against web access. The former can be performed through your site's Global Configuration page; please consult Joomla!'s documentation. The latter can be achieved through the directory password protection feature of your hosting control panel or by adding a .htaccess file (Apache web server) or web.config file (Microsoft Internet Information Services -IIS- server). If you are using a different server, such as NginX, the only way to protect the logs directory against unauthorised web access is using a directory outside your web server's root. Please consult your host if you are not sure how you can do this. - IP Lookup Service
-
Admin Tools will provide you with a link to look up the owner of an IP address in the emails it sends you, as well as the Blocked Requests Log and Auto IP Blocking Administrator pages. By default, it uses the ip-lookup.net service. This option allows you to use a different IP lookup service if you so wish.
Enter the URL of the IP lookup service you want to use in this text box. The
{ip}part of the URL will be replaced with the IP address to look up. For example, the default URL (for ip-lookup.net) ishttp://ip-lookup.net/index.php?ip={ip} - Email this address on blocked request
-
Enter one or more email addresses (separated by commas) which will get notified whenever a request is blocked on your site. For example
[email protected]for one recipient only or[email protected], [email protected], [email protected]for multiple recipients. The email addresses need not be in the same domain name and don't even need to be users of the site itself. Any email address will do.A "blocked request" is anything which triggers the Web Application Firewall and causes it to block an incoming request to serve a page. This is useful to get an ahead warning in the event of a bot trying to perform a series of attacks on your site.
The contents of the e-mails can be configured using the Email Templates feature in the Web Application Firewall page.
- Email this address on successful back-end login
-
Enter an email address which will get notified whenever someone successfully logs in to your site's administrator back-end. If you do not wish to use this feature, leave this field blank. If you enter an email address, every time someone logs in to the administrator area an email will be sent out to this email address stating the username and site name. If you want to send a notification to multiple email addresses separate them with commas, e.g.
[email protected],
                [email protected]
. The email addresses do not need to be in the same domain and they don't even have to be linked to users of your site.This allows you to get instant notification of unexpected administrator area logins which are a tell-tale sign of a hacked site. In that unlikely event, immediately log in to your site's back-end area, go to Extensions, Admin Tools and click on the Emergency Off-Line Mode button. This will cut off the attacker's access to the entirety of your site and gives you ample time to upgrade your site and its extensions, as well as change the password (and maybe the username) of the compromised Super Administrator account. For maximum security, after taking your site back on-line, log out, clear your browser's cookies and cache and log in again.
The contents of the e-mails can be configured using the Email Templates feature in the Web Application Firewall page.
- Email this address on failed administrator login
-
Enter an email address which will get notified whenever someone tries to log in to your site's administrator back-end but is denied access. If you do not wish to use this feature, leave this field blank. If you enter an email address, every time someone unsuccessfully tries to log in to the administrator area an email will be sent out to this email address stating the username and site name. If you want to send a notification to multiple email addresses separate them with commas, e.g.
[email protected],
                [email protected]
. The email addresses do not need to be in the same domain and they don't even have to be linked to users of your site.This allows you to get instant notification of unexpected administrator area login attempts which are a tell-tale sign of a hacked site. In that unlikely event, immediately log in to your site's back-end area, go to Extensions, Admin Tools and click on the Emergency Off-Line Mode button. This will cut off the attacker's access to the entirety of your site and gives you ample time to upgrade your site and its extensions, as well as change the password (and maybe the username) of a potentially compromised Super Administrator account. For maximum security, after taking your site back on-line, log out, clear your browser's cookies and cache and log in again.
The contents of the e-mails can be configured using the Email Templates feature in the Web Application Firewall page.
- Include password in failed login email
-
Should the incorrect password be included in the mail you receive when someone triggers a failed login? This only applies when Treat failed logins as a reason for blocking the request is enabled.
- Do not log these reasons
-
Blocked requests due to these blocking reasons will not be logged. As a result, IPs getting their requests repeatedly blocked because of this reason will not be automatically banned from your site. Moreover, as there is no log, it will be impossible to tell why someone is being blocked from accessing your site when they trigger one of those reasons.
For a list of what each reason means please consult the list of WAF log reasons. You can start typing or click on on the field to show the list of reasons.
The default setting is empty
- Do not send email notifications for these reasons
-
Blocked requests caused by these blocking reasons will not result in an email being sent to the email address specified in "Email this address on blocked request".
For a list of what each reason means please consult the list of WAF log reasons. You can start typing or click on on the field to show the list of reasons.
The default setting is empty
- Enable blocked requests email throttling
-
When this feature is set to Yes the email throttling options in the Email Templates feature in the Web Application Firewall page will be taken into account before sending an email to the email address specified in "Email this address on blocked request". By default, Admin Tools will not send more than 5 emails in 1 hour. When this option is set to No there will be no limit on the amount of emails Admin Tools will send you. Disabling this can be a bad idea because it will slow down your server and fill up your inbox in the case of a bot performing a massive attack against your site.
WAF: Customisation

The Customisation section allows you to change the way Admin Tools presents the error message to people who are denied access to the site.
- Custom Message
-
By default, Admin Tools uses a generic message ("Are you feeling lucky?") when a request is blocked. Considering that this may not be exactly the kind of message you want your visitors to see, we allow you to customise it. Just type in the message to be shown to site visitors when a request is blocked, e.g. "We have detected a possible security violation caused by your request. Please go back to the previous page and try again."
- Show errors using a customisable HTML template
-
By default, the Custom Message will be shown using Joomla!'s standard error message page. This is not always desirable, as that page lacks proper styling and admittedly looks very cheesy. When this option is enabled, however, Admin Tools will use a customisable HTML template.
The default HTML template file is located in the
components/com_admintools/View/Blocks/tmpl/default.phpfile. DO NOT MODIFY THIS FILE DIRECTLY! It will be overwritten on each upgrade. Instead, you will have to do a template override, as per the following instructions.Locate the directory of your front-end template. For example, this could be
templates/protostarif you are using the default template in Joomla!. Inside it there's a directory calledhtml. Create a new directory namedcom_admintoolsand inside it yet another new directory calledBlocks. In our example, you should now have a directorytemplates/protostar/html/com_admintools/Blocks. Copy thedefault.phpfile fromcomponents/com_admintools/View/Blocks/tmpltotemplates/protostar/html/com_admintools/Blocks. Edit that file and customise it to your heart's desire. Do note that unlike other Joomla! template files this is a full HTML page, including the opening and closing<html>tags.For more information regarding template overrides, please consult Joomla!'s documentation wiki page on the subject.
- Send troubleshooting email on administrative functions
-
Some Admin Tools administrative functions have the potential to make your site behave in a way you didn't expect or even lock you out of your site. This can happen because of a misunderstanding of what a security feature does, a misconfiguration or –more rearely– a browser or server mangling the configuration you are submitting to Admin Tools. We understand that this leads to frustration and occasional panic as you have no idea what happened and how to fix it.
For this reason Admin Tools will automatically send you an email with troubleshooting instructions every time you take any administrative action which might result in getting locked out of your site or your site not working properly. These actions include applying the initial configuration with the Quick Setup Wizard, changing the Web Application Firewall configuration, applying administrator password protection or saving a new .htaccess, web.config or NginX configuration file through the relevant Admin Tools features.
The email explains what change took place and includes links to our troubleshooter documentation which can help you get your site back to a working state. Moreover, it has a reminder about getting support from us if all else fails.
The email is sent only to the email address recorded on the user account logged into Joomla who initiated this change. It is not sent to other Super Users, Administrators or, in general, any other email address. Also note that if you have set Receive system email to No in your Joomla! user profile you will not receive this email.
This option can be used to turn off this feature for all administrator users with access to Admin Tools, regardless of their Receive system email status. We recommend leaving this option enabled unless you are absolutely sure you know what you're doing and you're confident you can find your way to the troubleshooter documentation on your own.
It's possible to accidentally lock yourself out of the administrator area, especially when using the Exclusive Allow IP List or IP Disallow List options of the Web Application Firewall. The easiest way to work around this issue is using an FTP application or your hosting control panel's File Manager to rename a file.
Go inside the
plugins/system/admintools/admintools directory
on your site. You will see a file named
main.php. Rename it to
main-disable.php. This will turn disable the
Web Application Firewall from executing and you can access your
site's back-end again. After you have fixed the cause of your issue
remember to rename main-disable.php back to
main.php, otherwise your site will remain
unprotected!