The Site Setup page can be used to optionally modify details of your restored site. It's not mandatory to go through its options if you are restoring on top of the same site you backed up from. All of the information in this page is pre-populated with the values read from the configuration.php file which was present in your backup archive's root.
ANGIE for Joomla! - The site setup page
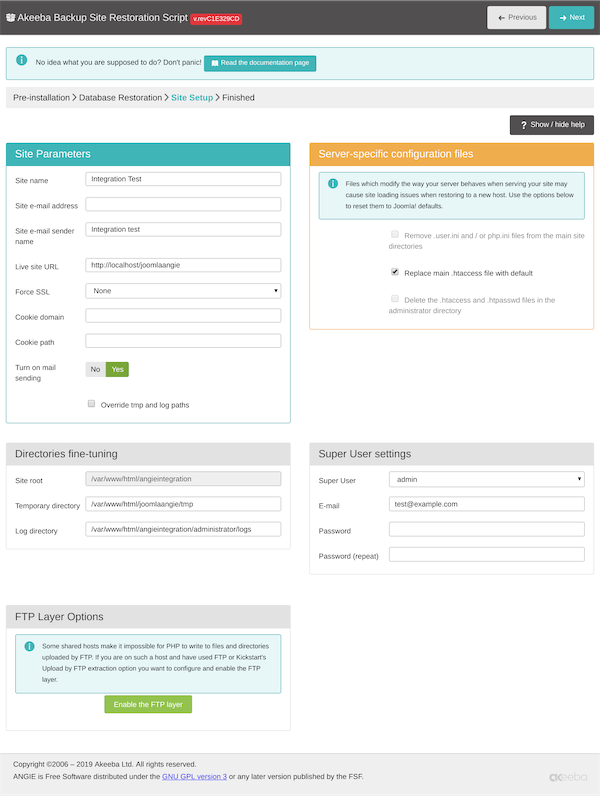
The Site Parameters area contains the most basic options for your site.
The Site Name is the name of the restored Joomla! site which appears throughout the Joomla! application. The Site e-mail address is the e-mail address from which all e-mail sent out from your site will appear to originate from. Similarly, the Site e-mail sender name is the sender's name appearing in those e-mails' From field.
The Live site URL is optional and
normally not required on the vast majority of hosts. If your site
doesn't seem to work properly – e.g. missing pictures, all links
resulting in 404 errors, etc – you may want to fill in your site's
URL, for example http://www.example.com (include the
http:// part, but not a trailing slash or
index.php!).
The Force SSL option will work exactly as the one in Joomla! Global Configuration. You can set it to None, Administrator Only or Entire Site. This is useful when you are restoring an SSL site on a server where you don't have any SSL certificate (for example localhost).
You will also see two more settings here regarding cookies. Under normal circumstances, both of them should be left empty. You only need to edit them if they are not blank and you are transferring your site to a different directory or domain name. The Cookie domain is the domain name of your site, without the protocol and, usually, without the www part. For example, if you are restoring to http://www.example.com, the Cookie domain is example.com (I will stress that again: there is NO http:// in there!!). The Cookie path is the subdirectory of your site, relative to the domain's root. If you are restoring to the root of a domain, e.g. http://www.example.com, then it is / (a single forward slash). If you are restoring to a subdirectory it's a slash followed by the directory's name. For example, if you're restoring to http://www.example.com/joomla then the Cookie path is /joomla (WITH a leading slash, but WITHOUT a trailing slash).
![[Warning]](/media/com_docimport/admonition/warning.png) | Warning |
|---|---|
|
If the Cookie domain and/or Cookie path settings are non-empty and do not correspond to the location (domain name and directory) you are restoring your site to, YOU WILL NOT BE ABLE TO LOG IN in the front- or the back-end of your site. On most servers you can just leave them blank (strongly recommended). Be advised that if you request support for this issue you will be ignored because there is nothing we can support you with; you are simply entering the wrong values in these fields. You have to either retry the restoration or edit your configuration.php file and modify the cookie_domain and cookie_path parameters. |
Turn on mail sending. Sometimes you don't want to enable mailing on your restored site, this option will modify your Joomla! Global Configuration to disable emails being sent using Joomla! framework.
Reset session options sets the Session Handler to Database and removes any customised Session Save Path; these are the Joomla! defaults. This allows you to use the restored site on a different server where the session handling settings of the original site and server don't work, e.g. if the original site used Redis or memcached, or if the original site used a custom Session Save Path.
Reset caching options sets the Cache to OFF - Caching disabled and the Cache Handler to File; these are the Joomla! defaults. This allows you to use restored site on a different server where the caching handling settings of the original site and server don't work, e.g. if the original site used Redis or memcached.
The Override tmp and log paths is a
handy feature if you are restoring to a subdomain or subdirectory
of the site you backed up from. It will force the paths to the
tmp and log directories
to point inside the restored site's tmp and
log directory respectively. If you don't
check this box, it is possible that the restored site will
reference the old site's tmp and
log paths, potentially causing issues in the
long run. As a rule of thumb: always check this option unless you
know what you are doing!
The Server-specific configuration files section helps you address issues relating to files which can change how your server performs when loading the site. Not all options are available or visible. ANGIE detects which ones can be used and disables or hides the other ones.
The .htaccess Handling drop-down allows you to decide what to do with your site's main .htaccess file, stored in your site's root. Please note that if you have a file named htaccess.bak the options here apply to that file as well. The reason is that upon clicking on Clean Up either in ANGIE or in Kickstart this file will be renamed to .htaccess. This entire feature or some of its options may not be available to you; ANGIE detects what is possible for your site and server.
- None
-
This option leaves the .htaccess file as-is.
- Use default
-
This option replaces the .htaccess file with the contents of the latest version of Joomla's default .htaccess file, the one that ships as htaccess.txt with Joomla itself. This option retrieves the latest version of htaccess.txt from Joomla's GitHub repository. It is conceivable that it might fail due to network issues.
- Remove PHP handler lines
-
Many hosts allow you to select which version of PHP you want to use with your site through their hosting control panel. In most cases this is done by adding some special lines which begin with AddHandler or SetHandler in your .htaccess file. However, these lines are specific to the host and sometimes to the server for which they were created. If you use the wrong AddHandler/SetHandler line you will get a 500 Internal Server Error or you will see the raw PHP source of your files when you try to access your site. Selecting this option removes the AddHandler/SetHandler lines, preventing this problem.
Do note that if you select this option and after clicking Next you might get an error or you may find that the Clean Up button in Kickstart no longer works. If this is the case please log into your hosting control panel and select a newer version of PHP.
- Replace PHP handler lines
-
Some hosts use a very old PHP version by default. We've seen hosts defaulting to PHP 5 versions which went end of life in December 2019 or even as early as 2014! These old versions of PHP are unsafe for use on live sites. Most importantly, neither our backup restoration software nor modern CMS (like Joomla and WordPress) will work with these old versions.
Typically, you'd go to your hosting control panel and select a newer PHP version before running Kickstart, the Site Transfer Wizard or the restoration script (ANGIE). What happens is that your host modifies your .htaccess file with an AddHandler or SetHandler line which tells the server to use a newer PHP version. However, your backup may already contain a .htaccess file with different or no AddHandler/SetHandler lines. If you were to proceed with the restoration of the .htaccess file as-is you'd end up in a situation where the restoration cannot proceed.
This option tells ANGIE to look in the .htaccess file for AddHandler/SetHandler lines and apply them to the htaccess.bak file; this is the file that is renamed back to .htaccess when you click on Clean Up in ANGIE or Kickstart. By doing that it ensures that your restored site will continue using the newer PHP version you selected.
ANGIE tries to automatically detect when this is needed and preselect this option for you. If you see it preselected we strongly recommend keeping it this way.
The Remove .user.ini and / or php.ini files from the main site directories option tells ANGIE to delete any .user.ini and php.ini files from the site's root and the administrator folder. These files are used to modify PHP configuration parameters. When transferring your site between servers they are likely to cause problems, preventing you from accessing your site. If this is the case repeat the restoration and select this option.
The Delete the .htaccess and .htpasswd files in the administrator directory option removes the password protection from the site's administrator directory. You need to do that if you are transferring your site between domains. The reason is that the .htaccess file in the administrator folder contains an absolute filesystem path to the .htpasswd file which is different on each server. Moreover, .htpasswd files may require different formats on each server. Removing the administrator password protection is the best approach to ensure you can log into your site's administrator after restoration. You can use your hosting control panel or third party software, such as Admin Tools, to reapply administrator login password protection on your restored site.
The FTP Layer Options area contains the necessary settings for enabling Joomla!’s FTP layer.
The Enable the FTP layer will activate Joomla!'s FTP layer, which forces the Joomla! core and several conforming extensions to write to your site's files using FTP instead of direct file access through PHP. This is designed to work around permissions issues with the majority of shared hosts. If you had to use Kickstart's Use FTP option or if you uploaded the extracted files manually through FTP you must enable it and go through these settings, unless your host told you that they are using suPHP.
The rest of the FTP settings are exactly the same as those you had to fill in Kickstart:
- Host name
-
Use the domain name to access your site's FTP server
- Port
-
Leave the default value (21) unless your host tells you otherwise. Do note that Joomla! only supports plain FTP. If your host tells you to use port 22 – which is used only by SFTP – it won't work.
- Username and password
-
What they claim to be, the user name and password to connect to your site's FTP server
- Directory
-
The absolute FTP path to your site's root. The easiest way to find it is using FileZilla to connect to your site and navigate to your site's root, which is usually a directory named
htdocs,httpdocs,http_docs,public_htmlorwww. Look at the right hand pane, above the folder tree (Remote site text box). Copy it and paste it in the Directory box.![[Tip]](/media/com_docimport/admonition/tip.png)
Tip You can instead fill in all of the other information, leave this field blank and click on the button next to it. If your FTP information is correct a popup directory browser appears. You can now browse to the site root directory. It's the one where you can see your site's
installation,includesandlibrariesdirectories. Once you're in there click on the button.
The next area is called the Super User settings.
In this pane you can change the details of one of the Super Administrators on your site. First, select the username of the Super User you want to modify from the User name drop-down list. Then, simply type and retype the new password in the two fields below. The final field, E-mail address, is the e-mail address linked to that Super User. Make sure the address you type in here is not used already used by another user of the site or you will be unable to reset your Super User password if you forget it.
![[Important]](/media/com_docimport/admonition/important.png) | Important |
|---|---|
|
This feature can change the password of exactly one Super User account (the one selected in the drop-down box). Its reason of existence is to allow you to reset the Super User password should you forget it or quite simply don't know it (e.g. restoring a client's site to a dev server). |
Then, we have the Directories fine-tuning pane with advanced settings meant for power users and site builders.
The two options you can modify are the Temporary Directory
and Log Directory paths. For your convenience, the absolute path
to the site's root is displayed above. You should only need to use
these fine-tuning parameters if you want to place the
tmp and log directories
outside your site's root. Both of them must be absolute paths. For
your convenience the absolute path to the site's root is printed
above so that you can get them right every time.
Finally, click on the button to
let ANGIE write your site's new
configuration.php file and display the final
page.