![[Tip]](/media/com_docimport/admonition/tip.png) | Tip |
|---|---|
|
You can download Akeeba Kickstart from our site's download page. The latest release is always at the top of the list. Older versions are available for use with older versions of our backup software (Akeeba Backup and Akeeba Solo). |
In order to use Kickstart, begin by downloading Kickstart
itself from our site. You will download a ZIP archive which you have
to extract first on your computer. Inside it you will find
kickstart.php, several .ini files and a couple of .js file. You need
to copy at least the PHP file into the root of the to be restored
site. For example, if you are restoring on a subdirectory named
example in the root of your XAMPP for Windows
installation, you need to copy the file inside the
c:\xampp\htdocs\example folder. Conversely, if
you are restoring to a live host, upload the PHP file using FTP in
your site's root.
The .ini files in the Kickstart ZIP package are translations. Kickstart will query your browser's default language and look for the respective translation file. For example, if the default browser language is German (de-DE) Kickstart will try to load the de-DE.kickstart.ini file in order to present you with a localized interface. If you want to take advantage of Kickstart's localization copy the respective .ini file in the same directory as the kickstart.php file. If unsure, upload all .ini files; they will be automatically removed after Kickstart finishes.
The .js files need not be uploaded. Kickstart will always
attempt to load these files over the Internet when they are not
present. If you do not have an Internet connection or your Internet
connection is very slow you will need to copy these .js files along
with kickstart.php for Kickstart to
work.
The final step before being able to extract the archive is, of
course, copying the archive itself in the same directory as
kickstsart.php. If you have a multi-part
archive remember to upload all of the archive parts, otherwise the
extraction will, of course, fail. Moreover, if you are restoring to
a live server please upload the backup archive and all of its parts
using the Binary transfer mode. We suggest using FileZilla to do
that. As soon as you connect to your site and right before uploading
any files click on the ,
,
menu item. This will ensure that
the backup parts will not be corrupted during transfer.
Once you're ready with the preparation, launch Kickstart by
visiting its URL which looks like
http://localhost/mysite/kickstart.php on local hosts, or
http://www.yoursite.com/kickstart.php on live
hosts.
The first page is a reminder of key facts about Kickstart:
Kickstart's first page
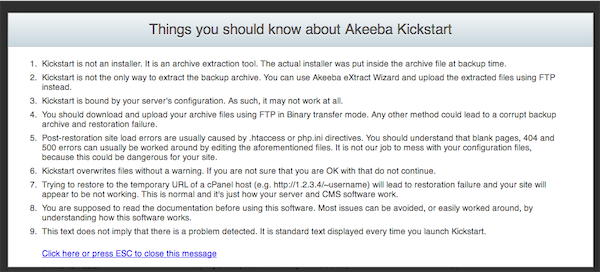
After reading it, press ESC to close the information window and display the main interface:
Kickstart - Select a backup archive

In the first step, select your backup archive file. Usually, there is only one file and it is pre-selected for you.
![[Important]](/media/com_docimport/admonition/important.png) | Important |
|---|---|
|
If you have a multipart backup archive only the main part with the .jpa, .jps or .zip extension will be displayed. The part files (.j01, .j02, ... or .z01, .z02, ...) will be extracted automatically. In fact, all of these part files MUST be present for the extraction to proceed. |
If you are restoring an encrypted archive (JPS) please enter the password to it in the Archive password (for JPS files) field. Please remember that the password is case sensitive: abc, ABC and Abc are three different passwords.
Kickstart - Select an extraction method
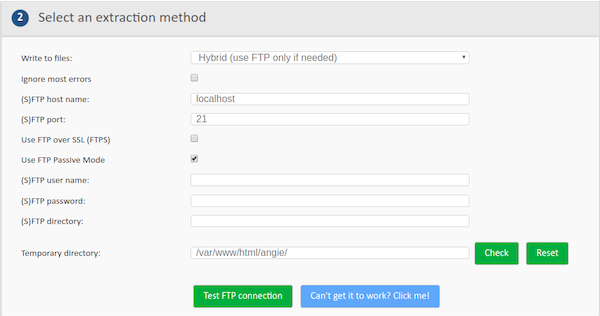
In the second step, you have to choose an extraction method.
The Directly method is the fastest and should work
on all local and most live hosts. If you get error messages about
unwritable files in later steps, you'll have to use the Use
FTP mode here. The best option is the
Hybrid one. It will intelligently switch between
Directly and Use FTP on a file-by-file basis, automatically
detecting which mode is more appropriate for it.
If you are using the FTP or Hybrid modes, you will see the FTP-specific options:
- FTP host name
-
Use the domain name or IP address to access your site’s FTP server. Do not use the ftp:// protocol prefix. For example,
ftp.example.comis correct whereasftp://ftp.example.comis wrong. - FTP Port
-
Leave the default value (21) unless your host tells you otherwise. Do note that Kickstart only supports plain FTP and FTP over SSL connections, but not SFTP. If your host tells you to use port 22 – which is used only by SFTP – it won’t work.
- Use FTP over SSL (FTPS)
-
Use only if your host tells you it is supported. FTPS is not the same as SFTP, do not confuse those two!
- Use FTP Passive Mode
-
It's a good idea to turn it on, as most servers require it. If your host told you they require active mode, uncheck this option.
- FTP user name and password
-
What they claim to be, the user name and password to connect to your site's FTP server
- FTP directory
-
The absolute FTP path to your site’s root. The easiest way to find it is using FileZilla to connect to your site and navigate to your site's root, which is usually a directory named
htdocs,httpdocs,http_docs,public_htmlorwww. Look at the right hand pane, above the folder tree (Remote site text box). This is what you want. Copy it and paste it in Kickstart's FTP directory box. - Temporary directory
-
If you followed the instructions at the beginning of this chapter above, you have already created a
kicktempdirectory with 0777 permissions. If not, do it now. After that, just append/kicktempto whatever is already written the Temporary Directory box. You can check that the directory exists and is really writeable by clicking on the button. The button will reset the box to its initial value should you accidentally mess up its contents.
Click on before proceeding to make sure that Kickstart can connect to your site through FTP before proceeding.
Kickstart - Fine tune
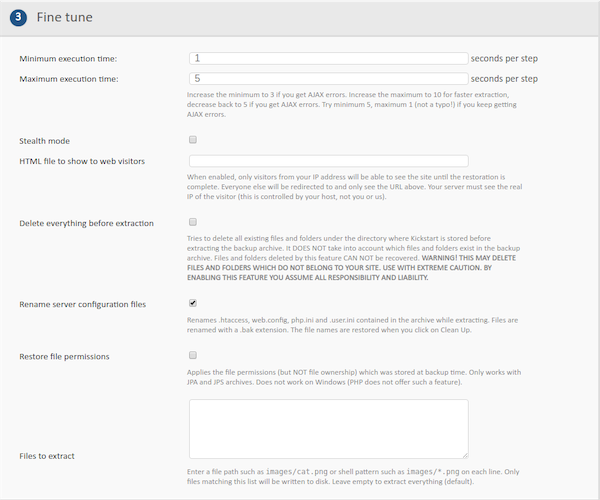
The fine tuning options are for advanced users only. Changing them might make it impossible to extract your backup archive. If you are not sure you understand what they do we advise you to not touch them.
- Minimum execution time
-
Akeeba Kickstart breaks down the archive extraction process in small chunks. This value determines the minimum amount of time each of these chunks should take. It's recommended to leave the default setting of 1 second. If you have a server with strict usage limits you are suggested to set this to 5 and the maximum execution time to 3 (yes, the maximum will be lower than the minimum, it's not a typo).
- Maximum execution time
-
Akeeba Kickstart breaks down the archive extraction process in small chunks. This value determines the maximum amount of time each of these chunks should take. Larger values will make the extraction marginally faster but more prone to server timeouts. Smaller values will make the extraction slower but less prone to server timeouts.
- Stealth mode
-
When an extraction and restoration takes place anyone with a web browser can navigate to Kickstart itself or the restoration script. This is problematic on the security front. Enabling the Stealth Mode will make your site available only to your IP address while the extraction and restoration is in progress. Anyone else visiting the site will see a static HTML page, given below. When you clean up after the restoration is over your visitors will see your site normally.
Important This feature only has any effect on hosts using the Apache web server or a compatible server which understands .htaccess files. It will definitely not work on hosts using IIS or NginX.
- HTML file to show to web visitors
-
This option allows you to define the name of the static HTML page to show to your visitors when the Stealth Mode above is enabled. The file and its resources (images, CSS, Javascript files) must reside inside your to-be-restored site's root. You must only define the name of the file to use, not its URL. This means that
offline.htmlis a valid setting, whereashttp://www.example.com/offline.htmlis INVALID and will result in a 404 error thrown to your visitors. - Delete everything before extraction
-
Tries to delete all existing files and folders under the directory where Kickstart is stored before extracting the backup archive. It DOES NOT take into account which files and folders exist in the backup archive. Files and folders deleted by this feature CAN NOT be recovered. WARNING! THIS MAY DELETE FILES AND FOLDERS WHICH DO NOT BELONG TO YOUR SITE. USE WITH EXTREME CAUTION. BY ENABLING THIS FEATURE YOU ASSUME ALL RESPONSIBILITY AND LIABILITY.
- Enable Stealth Mode while restoring
-
When using the integrated restoration feature you are extracting the backup archive, which includes the site restoration script, into your live site. This means that any visitor to your site would be seeing the restoration script. This is confusing for legitimate visitors and a security risk (if you'd not used the “ANGIE Password” feature during backup) as the restoration script will display the database connection information to your site.
Enabling the Stealth Mode addresses this issue. Right before Akeeba Backup starts extracting the backup archive it will rename your site's
.htaccessfile to htaccess.bak and replace it with a new one. The new file will issue a temporary HTTP redirection (HTTP 307) for all visitors to your site to the fileinstallation/offline.htmlwhich is included with the restoration script on all backups taken with Akeeba Backup and Akeeba Solo versions released after May 20th, 2021. This file tells your visitors that the site is temporarily under maintenance and they should come back later. Since this is a temporary redirection it does not cause any problems for your site's SEO; search engines will indeed come back later to re-index your site if you happen to start a site restoration right before or during their indexing your site.You should be aware of some facts and limitations of the Stealth Mode:
-
This feature only works on servers which support
.htaccessfiles, i.e. web servers tunning the Apache or Lighttpd web server software with the option to use.htaccessfiles enabled by the hosting company. If unsure, please ask your host. -
This feature requires your site being able to write to the .htaccess file in the site's root. In most cases this is not a problem. If the .htaccess file is NOT replaced when you enable this feature you will need to temporarily give more open permissions (e.g. 0666 – read and write to everybody) to the .htaccess file. This is not a security concern because the file will be replaced as soon as you start the restoration and its permissions will be reset.
-
The redirection applies to all visitors coming from a different IP address than the one your web server told PHP you are visiting from. If your IP address changes in the middle of the restoration — something which can happen automatically with some ISPs or if you have a temporary loss of network connectivity — you will also be locked out of the restoration yourself. There are manual override instructions after these bullet points.
-
Some servers may be behind a load balancer, proxy, caching proxy, CDN or a security firewall (or a combination thereof!); we will call them collectively "proxies". If the web server is not configured to use the forwarded IP address from these proxies it may report the wrong IP to PHP. As a result, the Stealth Mode will not work properly. You will either be allowing everyone to access your site (as if Stealth Mode was not present at all) OR you may find yourself locked out. There are manual override instructions after these bullet points. If you suspect that this happened to you please contact your host and ask them to reconfigure your server so it honors the forwarded IP address, typically conveyed from proxies through the HTTP X-Forwarded-For header. Modern versions of Apache, NginX and IIS are fully capable of doing that with some very straightforward configuration.
-
The Stealth Mode .htaccess will only be removed at the end of the restoration, when you click the “Finalize restoration” button in Akeeba Backup's / Akeeba Solo's interface OR the “Clean up” button in the restoration script (the latter only appears if your browser doesn't let the restoration script detect that it's running as part of the integrated restoration). If your restoration fails for any reason please take a look at the manual override instructions after these bullet points.
-
Finally, please note that Stealth Mode .htaccess also addresses another issue. If you are using a security hardened .htaccess file e.g. one created by a security plugin on your site (such as our own Admin Tools); or one you created yourself following security hardening instructions for your CMS (e.g. the security hardened .htaccess file you can find in Joomla's documentation, which is based on an old version of our own security hardened .htaccess) you may find that it's impossible to run the integrated restoration. The archive is extracted but you cannot access the installation folder. Enabling Stealth Mode will remove the security hardened .htaccess temporarily, overcoming this problem.
Manual override. If for any reason you are locked out of the restoration script or the restoration doesn't complete and you want to regain access to your site, please delete the .htaccess file from your site's root. Then rename the file htaccess.bak to .htaccess (note the dot in front of the file's name!). If this happens consistently to you, we advise you to ask your host how to apply password protection to your site's root and do that right after you start extracting your backup archive. Furthermore, you should take the following steps to mitigate the issues normally addressed by Stealth Mode without having to use Stealth Mode on your site when performing an integrated restoration:
-
Use the “ANGIE Password” feature in all your backup profiles. This will require entering a password to access the restoration interface after extracting your backup archive. This will be less confusing for legitimate visitors. Moreover, it mitigates the potential security issue of divulging your database connection information as access to the database restoration page will require entering the ANGIE Password first.
-
Configure your security plugins. If you are using a security plugin which creates a security strengthened .htaccess file, such as our Admin Tools Professional for WordPress, please configure it so that access to the
wp-content/plugins/akeebabackupwp/app/restore.phpfile and theinstallationfolder (and all of its files, including .php files) is allowed. Admin Tools Professional for WordPress includes the former by default but not the latter.
-
- Rename server configuration files
-
Renames .htaccess, web.config, php.ini and .user.ini contained in the archive while extracting. Files are renamed with a .bak extension. The file names are restored when you click on Clean Up.
- Restore permissions
-
Applies the file permissions (but NOT file ownership) which was stored at backup time. Only works with JPA and JPS archives. Does not work on Windows (PHP does not offer such a feature).
- Files to extract
-
Enter a file path such as
images/cat.pngor shell pattern such asimages/*.pngon each line. Only files matching this list will be written to disk. Leave empty to extract everything (default).
Kickstart - Extract files
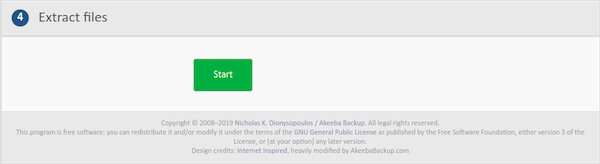
Click on the big green Start button. Kickstart will start extracting your site's files.
Kickstart- Extracting
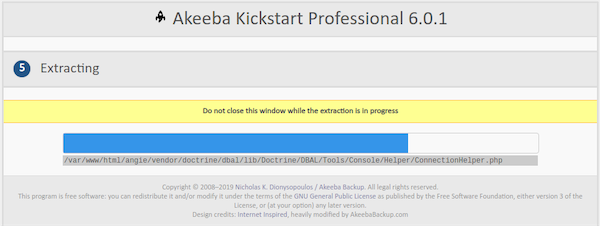
The blue bar fills up while your site files are being extracted.
If you get an “Unwritable file” error message, go back and enable the Use FTP option before re-trying extraction. If all else fails, extract the archive locally and upload the extracted files to your site by FTP.
If you get an error message that the archive is corrupt, you have to check two things. First, make sure that you have uploaded all archive parts. In a multi-part archive situation, there is the main .jpa, .jps or .zip file and several “part files” with the same name as the main file but with extensions like .zip, .z01, .z02, etc (ZIP) or .jpa/.jps, .j01, .j02, etc (JPA/JPS). You have to upload all of those files for the extraction to work.
The other think you must check is how you downloaded and uploaded the backup archives. As mentioned in "The recommended method' section, you should use FTP in Binary transfer mode. This holds true for uploads as well. Try uploading the backup archive again, using FTP in Binary Transfer mode and retry. This usually does the trick.
When the extraction is over, Kickstart offers you a link to open the restoration script which was included in your archive file and is just extracted to your site:
Kickstart- Restoration and Clean Up
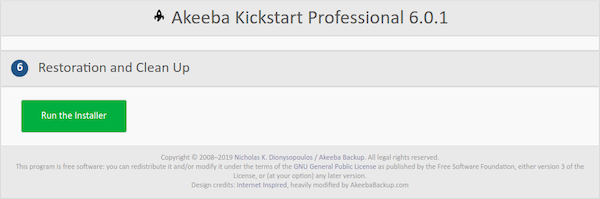
Click on this button and start reading the next chapter, detailing the use of the restoration script. Do not close Kickstart’s window/tab yet! You will need it to clean up after the restoration is over.
![[Note]](/media/com_docimport/admonition/note.png) | Note |
|---|---|
|
Kickstart extracts the |
Kickstart- Restoration and Clean Up
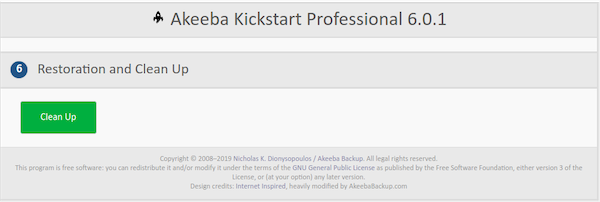
Once you are done with the restoration script, click on the Clean Up button. This will remove the installation directory which holds the restoration script, Kickstart's files, the backup archive (and all its part files) and rename the file mentioned above back to their normal names.
Kickstart- Restoration and Clean Up
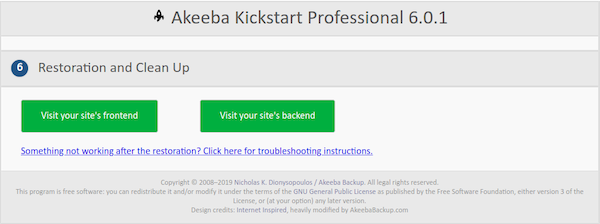
Use the button to visit your site. Ignore the other button; it's only used for backups taken with Akeeba Backup for Joomla!.