Table of Contents
- Installing Akeeba Solo (Standalone)
- Installing Akeeba Backup for WordPress
- WordPress roles and Akeeba Backup privileges
- Using on sites with BulletProof Security installed
- Using on CloudWays and other hosts which limit access to .php files
- Updating to the latest version
- Requesting support and reporting bugs
- Understanding PHP versions
Before you begin
Installing Akeeba Solo is simple. Before you begin you need to collect some information from your host:
-
Database connection information (host name, username, password and database name). You can use the same database as an existing site (e.g. a WordPress or Joomla! installation) or an entirely new database. This is encouraged but not necessary.
-
FTP or SFTP connection information. You will need that to upload Akeeba Solo's files and you may have to provide them if Akeeba Solo detects a problem writing to its files.
The first thing you need to do is to download Akeeba Solo from
our site. It's a ZIP file. Extract it and upload all files and
directories in a web-accessible directory on your server. We recommend
using a directory called solo inside your web
root. Your web root is usually the directory called www, public_html,
htdocs, httpdocs or something similar when you connect to your site
over FTP.
![[Tip]](/media/com_docimport/admonition/tip.png) | Tip |
|---|---|
|
Advanced users can use Akeeba Kickstart to extract Akeeba Solo's ZIP file directly on their server. |
Launching the web installer
The next step is to access Akeeba Solo's web installer. You can
do that by visiting the directory you uploaded Akeeba Solo in with
your browser, e.g. http://www.example.com/solo where
www.example.com is your site's domain name and
solo is the name of the directory you uploaded
Akeeba Solo to.
![[Note]](/media/com_docimport/admonition/note.png) | Note |
|---|---|
|
Akeeba Solo's web installer appears as soon as you try to
access any page in Akeeba Solo when its configuration file (stored
in For security reasons you cannot access the web installer once
Akeeba Solo is configured. If you ever want to do that again you
will have to remove or rename the configuration file
|
The unwriteable session page
If Akeeba Solo detects that your server's session write path is unwriteable, it will show the following page:
The unwriteable session page
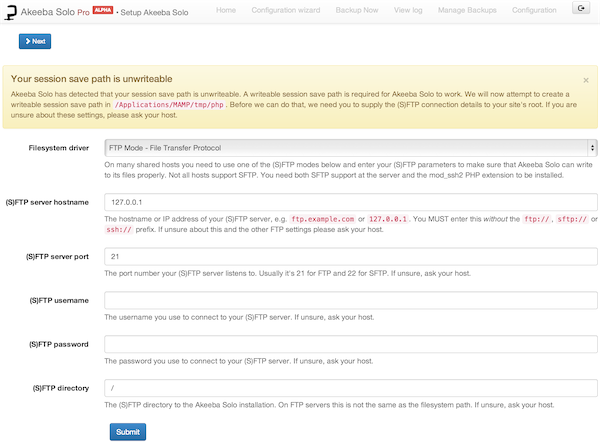
In the first drop-down please select the connection method to your site's server: FTP or SFTP. In the fields below enter your server connection information. If you are unsure about these settings please ask your host. They do know what these are; we don't. If we could guess it somehow we wouldn't have to ask you to enter it. When you're ready click on the blue button at the bottom of the form to proceed to the next page.
Alternatively, you can ask your host to fix the session save
path in their server's php.ini file and make sure
it's writeable. Just ask them, they know what to do.
The main page
If there was no problem with the session path detected or if you just fixed it, you will see the main page of Akeeba Solo's web installer:
The main page
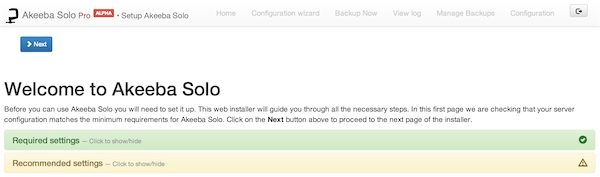
If any of the Required Settings are marked as No (red) you may proceed with the installation but Akeeba Solo will most likely fail to operate on your server. If any of these settings are red, please contact your host to fix it for you.
The Recommended Settings are just that: recommendations for optimal operation. Even if one or more of them are yellow (not optimal) you can still use Akeeba Solo, but some features might not be available. For instance, if cURL is not available you can't use the cloud backup features.
When you are ready, click on the button at the top of the page.
The database configuration page
The next step is to tell Akeeba Solo where to put its database data. You will have to enter the following data, most of which can be provided by your host.
![[Important]](/media/com_docimport/admonition/important.png) | Important |
|---|---|
|
You must create a database BEFORE installing Akeeba Solo. The web installer is unable to create the database for you! |
- Database type
-
Select the database server technology you are going to use.
Please note that for MySQL there are two options: MySQLi and MySQL (with or without the i at the end). Most servers allow you to use the newer, better, faster MySQLi (with the i at the end) option. If this doesn't work, you can also try using the one without the i at the end. This is discouraged as that option is the older, slower one which may have a performance impact on your backups.
- Database server host name
-
The host name or IP address of your database server. It is usually localhost or 127.0.0.1 which are very different as far as the database connection is concerned. If localhost doesn't work, try 127.0.0.1 (note: these are dots, not commas, between the numbers). Otherwise please ask your host. Some hosts require something different in there, e.g. database123.example.com.
- User name
-
The user name you use to connect to your database. This is provided by your host.
- Password
-
The password you use to connect to your database. This is provided by your host.
- Database name
-
The name of your database. This is provided by your host.
- Database table name prefix
-
This is the common prefix of all database tables used by Akeeba Solo. It has to be two to four lowercase characters a-z and numbers 0-9 followed by an underscore. If you are unsure, use the default value of solo_
Finally click on the button at the bottom of the page. If your information is correct you will see the next page. Otherwise you will see the database setup page again. In this case, please double check your database connection information, it is definitely wrong. If you are not sure, please ask your host.
The application configuration page
The next page allows you to set up the basic parameters of the Akeeba Solo application and create the user you will be using to log in to it. It is divided into two panes (sections).
The application configuration pane
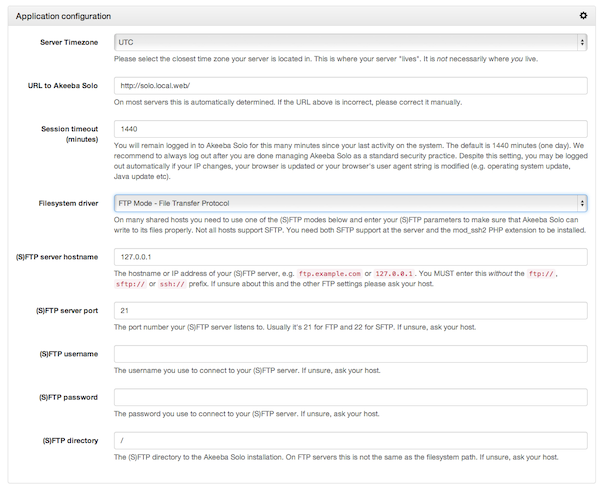
The Application configuration pane lets you define the most basic configuration parameters required for Akeeba Solo to work.
| Tip |
|---|---|
|
You can modify these parameters from the System Configuration page once Akeeba Solo is installed. |
The available settings are:
- Server timezone
-
Please select the timezone where your server is located in. Please note that this may be different than the timezone you or your host are in. For example, a client in Germany is using a host based in the United Kingdom who has a server in Dallas, USA. The timezone of the server is the one for Dallas, USA (which is America/Chicago – you need a map to understand why). If you are unsure, ask your host. That's probably the easiest question you can make to them.
- URL to Akeeba Solo
-
This is the full URL to Akeeba Solo itself. Akeeba Solo tries to automatically detect it. On about 5% of servers out there this is not possible. If you see something strange here, please correct it. You need a full URL, e.g.
http://www.example.com/solo - Session timeout (minutes)
-
Akeeba Solo will automatically log you out if you have not interacted with it for that much time. The default setting (1440 minutes) is one day. We recommend you to use a lower setting for security reasons. Something between 30 and 60 minutes is ideal.
- Filesystem driver
-
Akeeba Solo needs to write to certain files (e.g. your configuration file) and modify the directory permissions to make it possible for backup files to be written. This is the job of the filesystem driver. You have the following options:
-
Direct file writes. Akeeba Solo writes to the files directly. This is the best option for most high-end hosts and dedicated servers. On many shared hosts it is unlikely that it will work correctly.
-
FTP Mode - File Transfer Protocol. Akeeba Solo will try to write to the files directly. If it is not possible it will connect to your site through FTP and attempt to complete the file write using the FTP connection. This is the best option for most shared hosts.
-
SFTP Mode - Secure File Transfer Protocol (over SSH). Akeeba Solo will try to write to the files directly. If it is not possible it will connect to your site through SFTP and attempt to complete the file write using the SFTP connection.
Please note that FTP and SFTP are very different protocols. The former is a fairly simple protocol that is supported by almost every server out there. The latter is a more secure (and faster) method, but it's not supported by all servers and does require your host to provide the SSH2 PHP module. Akeeba Solo tells you if the SSH2 module is available in the Recommended Settings section of the main page of its web installer (discussed a little earlier in this documentation).
If you choose the FTP or SFTP mode you will see the following configuration parameters as well.
-
- (S)FTP server hostname
-
The hostname or IP address of your (S)FTP server, e.g. ftp.example.com or 127.0.0.1. You MUST enter this without the ftp://, sftp:// or ssh:// prefix. If unsure about this and the other FTP settings please ask your host.
- (S)FTP server port
-
The port number your (S)FTP server listens to. Usually it's 21 for FTP and 22 for SFTP. If unsure, ask your host.
- (S)FTP username
-
The username you use to connect to your (S)FTP server. If unsure, ask your host.
- (S)FTP password
-
The password you use to connect to your (S)FTP server. If unsure, ask your host.
- (S)FTP directory
-
The (S)FTP directory to the Akeeba Solo installation. On FTP servers this is not the same as the filesystem path. If unsure, ask your host.
The login setup pane
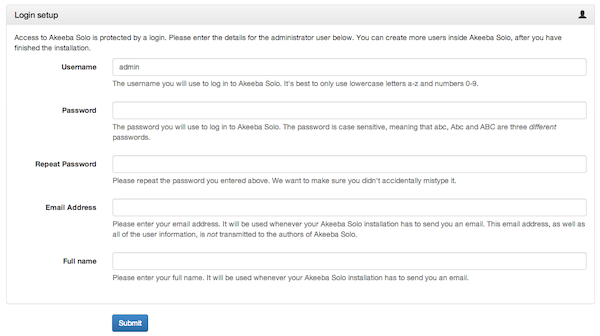
The Login setup pane below lets you create your first Akeeba Solo user. Why do you need one? Akeeba Solo is only accessible if you enter a username and a password, for security reasons. Otherwise anyone would have access to your backups, therefore your entire site. Bad idea! Moreover, each user can have different privileges. You can have one user with full access, one who can only take backups, one who can only download backups and so on. This section allows you to create a user with full access. The information you need is:
- Username
-
The username you will use to log in to Akeeba Solo. It's best to only use lowercase letters a-z and numbers 0-9. Other characters, including spaces, accented characters, international (e.g. Cyrillic, Greek, Hebrew, Chinese, Japanese, etc) characters and so on will usually work on most servers, but they are discouraged. Support for such characters depends on the database, web server and web browser setup.
- Password
-
The password you will use to log in to Akeeba Solo. The password is case sensitive, meaning that abc, Abc and ABC are three different passwords.
- Repeat password
-
Please repeat the password you entered above. We want to make sure you didn't accidentally mistype it.
- Email Address
-
Please enter your email address. It will be used whenever your Akeeba Solo installation has to send you an email. This email address, as well as all of the user information, is not transmitted to the authors of Akeeba Solo.
- Full name
-
Please enter your full name. It will be used whenever your Akeeba Solo installation has to send you an email.
When you are ready, click on the button at the bottom of the page.
The end of the web installer
At this point the web installer has finished and will try to save your configuration file to your server. If it is not possible, it will provide you with instructions on how to do that manually. If the configuration was saved you will then be taken to the login page. After logging in with the username and password you chose in the Login setup section of the previous page you can start using Akeeba Solo.
We recommend that the first thing you do is to use the Configuration Wizard to set up what Akeeba Solo has to back up.