The Configuration page is where you can fine tune the settings of the application. These settings are applied per backup profile.
The page is split in to many sections - or panes, if you like - each one serving as a group for closely related options. Each of those panes displays a title and below it you can find all of the options. Hovering your mouse over the label - the left hand part of each row - you will be presented with quite a big tooltip providing short documentation of the setting and its available options. The tooltip will remain open until you hover your mouse / tap it again, or you open another tooltip. This way you won't have to refer to this document constantly when configuring the application.
Some of the settings also feature a button. They can either do some action, like browsing for a folder and testing connection parameters, or it may be labeled . This latter case is more interesting, as pressing the button will toggle the display of a sub-pane which contains options for this specific setting. This user interface feature is primarily used for "engines" type settings.
Another interface element worth mentioning are the composite drop-downs. Whenever you are supposed to enter a number we well present you with a drop-down menu of the most common options. You can either select a value from the list, or select "Custom...". In the latter case, a text box appears to the right of the drop-down. You can now type in your desired value, even if it's not on the list. Do note that all of these elements have preset minimum/maximum values. If you attempt to enter a value outside those boundaries, or an invalid number, they will automatically revert to the closest value which is within the preset bounds.
The top of the Configuration page
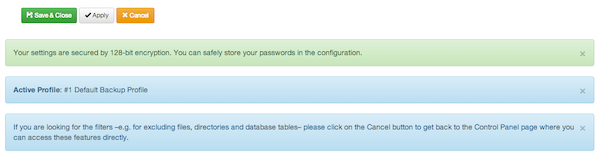
At the very top of the page you can find the toolbar area. Clicking on will save your settings and take you back to the main page. The button will save the configuration and remain on the configuration page. The buttonSaves all changes and creates a new backup profile with the new (saves) changes. Then it switches to this new backup profile and opens its Configuration page. This allows you to create multiple variations of the same backup profile very easily. It is equivalent to using Copy in the backup profiles page and then clicking on the profile's Configuration button, only with less clicks. The button aborts any changes made and takes you back to the main page.
Then you can see the information about the encryption of your settings. If your server has the mcrypt or OpenSSL PHP extension and the AES-128 (Rijndael) encryption method is available to it Akeeba Solo / Akeeba Backup will automatically encrypt your configuration settings before storing them to the database. Please keep in mind that even if your site is using HTTPS this doesn't mean that you have the OpenSSL PHP extension installed. You usually have to ask your host to enable it for you. The encryption provides a very good protection against most attacks against the configuration, preventing the attacker from gaining access to sensitive information. In this case you will see a green message telling you that your settings are secured by 128-bit encryption (depicted above). In the opposite case you will be warned not to save any passwords in the configuration of the application.
![[Note]](/media/com_docimport/admonition/note.png) | Note |
|---|---|
|
Encryption is not a panacea. The configuration is stored in the database encrypted and the decryption key is stored in a file. This is meant to protect you from a vulnerability which allows the attacker to only access the database. If the attacker can read or, worse, write to your site's files your settings can be reasonably considered compromised: the attacker has all the information they need to retrieve both the encrypted data and the decryption key. Furthermore, whenever you export a backup profile the resulting file is unencrypted. This is on purpose. The decryption key is site-specific, generated whenever you do a clean installation of Akeeba Backup / Akeeba Solo on your site. If the settings were exported encrypted you'd be unable to import them on a different site. |
Immediately below it you you can see the numeric ID and title of the active backup profile. This acts as a reminder, so that you know which profile's settings you are editing.
The rest of this document is separated into sub-sections. The first sub-section describes the settings of each of the main configuration panes, whereas the rest of the sections discuss the settings made available to you through sub-panes.
Basic configuration
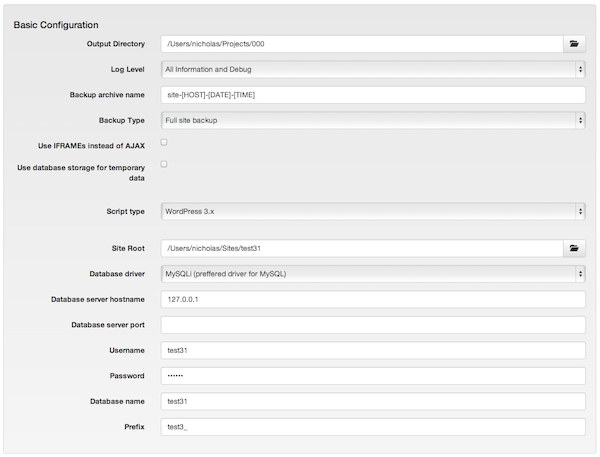
- Output Directory
-
This is the directory where the result of the backup process goes. The result of the backup - depending on other configuration options - might be an archive file or a SQL file. This is also where your backup log file will be stored. The output directory must be accessible and writable by PHP.
![[Important]](/media/com_docimport/admonition/important.png)
Important Providing a directory with adequate permissions might not be enough! There are other PHP security mechanisms which might prevent using a directory, for example the
open_basedirrestriction which only allows certain paths to be used for writing files from within PHP. The application will try to detect and report such anomalies in the main page, before you attempt a backup.You can use the following variables to make your setting both human readable and portable across different servers - or even different platforms:
-
[DEFAULT_OUTPUT] is replaced by the absolute path to your site's default backup output directory. On Akeeba Solo Standalone this is the
backupsdirectory in the root of your Akeeba Solo installation. On Akeeba Solo for WordPress this is theapp/backupsdirectory inside the plugin's installation folder (usually this means that the full directory iswp-content/plugins/akeebasolowp/app/backups). This is assigned as the default location of output files unless you change its location. If you leave it as it is, you are supposed to make sure that the permissions to this directory are adequate for PHP to be able to write to it. -
[SITEROOT] is automatically replaced by the absolute path to your site's root
-
[ROOTPARENT] is automatically replaced by the absolute path to the parent directory of your site's root (that is, one directory above your site's root)
Is this over your head? No problem! Just click on the button which looks like an open folder to the right of the text field and a pop-up directory navigator will allow you to find the proper directory. Next to the folder's location there is the button labeled . Click on it to make the current directory the selected one and close the pop-up. To make it even easier for you, the application displays a small icon next to the button. If it's a green check mark the directory is writable and you can use it. If it's a red X sign, the directory is not readable and you either have to select a different directory, or change this directory's permissions.
![[Warning]](/media/com_docimport/admonition/warning.png)
Warning NEVER, EVER, UNDER ANY CIRCUMSTANCES SHOULD YOU USE YOUR SITE'S ROOT AS YOUR OUTPUT DIRECTORY! This will usually lead to corrupt backup or backup failure. The reason is that the output directory and all of their contents are automatically excluded from the backup set. However, even if your backup succeeds due to a bug (remember, it's supposed to fail!), using your public, web accessible site root as your output directory is like a party invitation to hackers worldwide. Be security conscious, always use a directory that's not publicly accessible for storing your backups. The default backup output directory is inaccessible to the public if you are using IIS, Apache or any other server which understands .htaccess or web.config syntax. If you are using NginX, however, you need to supply a directory of your own which is located outside your public web root.
-
- Log Level
-
This option determines the verbosity of the application's log file:
-
Errors only. Only fatal errors are reported. Use this on production boxes where you have already confirmed there are no unreadable files or directories.
-
Errors and warnings. The minimum recommended setting, reports fatal errors as well as warnings. The application communicates unreadable files and directories which it wasn't able to backup through warnings. Read the warnings to make sure you don't end up with incomplete backups! Warnings are also reported in the Backup Now page GUI irrespective of the log verbosity setting as a convenience.
-
All information. As "Error and Warnings" but also includes some informative messages on the backup process.
-
All Information and Debug. This is the recommended setting for reporting bugs. It is the most verbose level, containing developer-friendly information on the backup operation. This is what we need to help you in case of a problem. This will also create a 2-5Mb log file on most sites, so you should only use this until you have achieved consistently valid backup archives creation.
-
None. This log level is not recommended. You should only use this if you are paranoid and want no log files written on the server. However, if you are truly concerned about security, you should protect the backup output directory instead of using this log level!
Our testing servers usually run on Errors and Warnings or All Information levels. When we are testing new releases or change our server setups, we switch to All Information and Debug until we are sure everything is flowing smoothly.
-
- Backup archive name
-
Here you can define the naming convention of backup files. There are a few variables available. Variables are special pieces of text which will be expanded to something else at backup time. They can be used to make the names of the files harder to guess for potential attackers, as well as allow you to store multiple backup archives on the output directory at any given time. The available variables and their expansion at backup time are:
- [HOST]
-
The host name of the site being backed up.
Note If you are using Akeeba Solo (standalone) and have not set up the Site's URL option in the Configuration Wizard or the Configuration page this variable will instead contain the host name of where Akeeba Solo is installed, not necessarily the same as where the backed up site is located. We recommend you always specify the Site's URL to avoid confusion.
- [DATE]
-
The current server date, in the format YYYYMMDD (year as four digits, month as two digits, day as two digits), for example 20080818 for August 18th 2008.
- [YEAR]
-
The year of the current server date, as four digits
- [MONTH]
-
The month of the current server date, as two digits (zero-padded)
- [DAY]
-
The day of the current server date, as two digits (zero-padded)
- [WEEK]
-
The current week number of the year. Week #1 is the first week with a Sunday in it.
- [WEEKDAY]
-
Day of the week, i.e. Sunday, Monday, etc. The full name is always returned in English.
- [RANDOM]
-
A 16-character random string.
Using this variable makes it outright implausible that an attacker can successfully guess the filename of your backup archive and access it over the web if you are using a backup output directory that's under your site's root and which is unprotected from direct web access, either because you have not put a .htacces or web.config filename or because your web server does not understand (e.g. NginX) or is not configured to honor such files.
Please note that -[RANDOM] will be appended automatically to the Backup archive name if you are using the default backup output directory and you are not already using the [RANDOM] variable in your Backup archive name. This will happen automatically at backup time. You cannot override this behavior because it is a security feature.
- [TIME]
-
The current server time, in the format HHMMSS (hour as two digits, minutes as two digits and seconds as two digits), for example 221520 for 10:15:20 pm.
- [TIME_TZ]
-
The current server time, in the format HHMMSSGMTOOOO (hour as two digits, minutes as two digits and seconds as two digits followed by GMT and the the offset to the GMT timezone as four digits), for example 221520GMT+0300 for 10:15:20 pm in Nicosia, Cyprus (which is 3 hours ahead of GMT).
We strongly advise using this instead of [TIME] to remove any ambiguity on which timezone is being used. This is especially important if you rely on the filenames to understand which is the backup you are looking for or when you have mulitple people taking and restoring backups in different timezones.
- [TZ]
-
The timezone all dates and times are expressed in. This variable gives you the timezone in a manner that is safe for use in filenames, even on Windows. For example, asia_nicosia for Nicosia, Cyprus.
- [GMT_OFFSET]
-
The timezone all dates and times are expressed in. This variable gives you the timezone as an offset to the GMT timezone. For example +0300 for Cyprus (3 hours ahead of GMT), +0530 for India (5 hours 30 minutes ahead of GMT) or -0600 for Chicago (6 hours behind GMT).
- [TZ_RAW]
-
The timezone all dates and times are expressed in. This variable gives you the raw timezone, e.g. Asia/Nicosia for Nicosia, Cyprus. Kindly note that this results in invalid filenames on Windows.
- [VERSION]
-
The version of Akeeba Solo / Akeeba Backup. Useful if you want to know which version generated this archive file.
- [PLATFORM_NAME]
-
The name of the platform Akeeba Backup is currently running under. This always returns "Joomla!".
- [PLATFORM_VERSION]
-
The version of the platform Akeeba Backup is currently running under. This always returns the current Joomla! version, e.g. 2.5.4.
- [SITENAME]
-
The name of the site, lowercased and transformed into a format which guarantees compatibility with all filesystem types commonly found in modern Operating Systems. Please note that the site name will be trimmed at 50 characters if it's longer.
The date and time options are expressed in the timezone selected in the System Configuration page under Backup Timezone. By default this is GMT. You are advised to change this to the timezone your site administrators are most familiar with.
- Backup Type
-
It defines the kind of backup you'd like to take. The backup types are:
-
Full site backup which backs up the site database, any extra databases you might have defined and all of the site's files. This produces a backup archive with an included installer script so that you can restore your site with ease. This is the option 90% of the users want; it is the only option which creates a full backup of your site, capable of producing a working site if everything is wiped out of your server.
-
Main site database only (SQL file) which backs up only the site's database. It results in a single SQL file which can be used with any database administration utility (e.g. phpMyAdmin) to restore only your database should disaster strike. This option is recommended for advanced users only.
-
Site files only which backs up nothing but the site's files. It is complementary to the previous option.
Warning Having one "main site database" backup and one "sites files only" backup is not equal to having a full site backup! The full site backup also includes an installation script which allows you to effortlessly recover your site even if everything is wiped out of your server. It acts as the glue between the two pieces (files and database).
-
All configured databases (archive file) which creates an archive file containing SQL files with dumps of your main site's database and all of the defined additional databases, along with a restoration script. Optionally, the database dumps can also be restored by any database administration tool (for example phpMyAdmin for MySQL).
-
Incremental (files only). This is the same as the Site files only option, but instead of backing up all of your site's files, it only backs up the files which changed since the last time you performed a backup with this backup profile. The only comparison made is between the file's modification time and the time the last successful backup was taken with this backup profile. The "last successful backup" refers to the last backup made using this backup profile and which has a status of "OK", "Remote" or "Obsolete".
Restoring an incremental backup set is a manual process. You have to manually extract the files from your "base" backup (an archive made with a Full Site Backup profile), then extract all incremental archives on top of it. Finally, use this collection of extracted files to restore your site. This process should only be used if you really know what you are doing. Do not trust that Akeeba Solo / Akeeba Backup can sort out the collection of incremental backups and help you restore them. It won't.
Important The incremental backup DOES NOT know which files / directories were removed. As a result, restoring it will NOT remove files and directories removed since the last backup. This is a very important fine point you should bear in mind.
-
Full site, incremental files. This backup is a combination of Full site backup and Incremental. It works like a full site backups except for the site files. The site files are treated the same as an Incremental backup, i.e. only modified files are included. This backup type is intended for sites with frequently changing database contents and infrequently changing files. The same warnings about restoration as an Incremental backup apply.
-
- Client-side implementation of minimum execution time
-
Akeeba Solo splits the backup process into smaller chunks, called backup steps, to prevent backup failure due to server time-out or server protection reasons. Each backup step has a minimum and maximum duration defined by the Minimum Execution Time, Maximum Execution Time and Execution Time Bias parameters in this Configuration page. If the step takes less time to complete than the minimum duration Akeeba Solo will have to wait.
When this box is unchecked (default) Akeeba Solo will have the server wait until the minimum execution time is reached. This may cause some very restrictive servers to kill your backup. Checking this box will implement the waiting period on the browser, working around this limitation.
Important This option only applies to backups taken using the graphical web interface of Akeeba Solo. Front-end, JSON API (remote) and Command-Line (CLI) backups always implement the wait at the server side.
- Use IFRAMEs instead of AJAX
-
Normally, the application is using AJAX postbacks to perform the backup process without timing out. Its ability to do so depends on how well your server plays along with your browser's Javascript engine. Sometimes, this is just not possible at all and you'll experience the backup stalling at random points through the backup process. If modifying the other options doesn't help, enable this feature. When enabled, instead of using AJAX calls, the application will create a hidden IFRAME in the page and perform all server communications through it. Since IFRAMEs load the backup URL as if it were a regular web page, it minimizes the probability of conflicts. The major drawback is that this method is about 50% slower than the AJAX one, so your backup will take substantially longer.
- Use database storage for temporary data
-
Normally, the application stores temporary information required to process the backup in multiple steps inside files in your Output Directory. Sometimes, especially on low-end hosts with ancient versions of PHP, this causes backup issues such as the backup restarting all the time. In those cases, you can check this box and the application will use your site's database to store this temporary information.
Do note that on some hosts this will cause the backup to fail with a "MySQL server has gone away" error message. That is a problem with the host's configuration. In those cases, nothing can be done. Our suggestion: if you receive such an error, migrate your site to a new host as the one you are using is most likely very restricted and severely under-powered. Moving to a faster, more reliable host can benefit your site in many more ways than just being able to run a backup.
- Script type
-
Only for Akeeba Solo (standalone). This is where you can give the application a few more hints about the script / CMS your site is using, allowing it to optimise the backup process. Your options are:
- Joomla!
-
Select this if your site is using the Joomla! content management system. The application will automatically exclude its cache, log and temporary data from the files backup, as well as the session and smart search data from the database backup.
- WordPress 3.x
-
Select this if your site is using the WordPress blogging / content management system.
- Generic or bespoke PHP script
-
Select this for any other type of site.
- Site root
-
Only for Akeeba Solo (standalone). The root directory of the site to back up. It's the same thing that you defined in the Configuration Wizard.
- Database type
-
Only for Akeeba Solo (standalone). Select the database server technology you are using with your site. Akeeba Solo only supports MySQL database servers.
Please note that there are two options: MySQLi and MySQL (with or without the i at the end). Most servers allow you to use the newer, better, faster MySQLi (with the i at the end) option. If this doesn't work, you can also try using the one without the i at the end. This is discouraged as that option is the older, slower one which may have a performance impact on your backups.
- Database server host name
-
Only for Akeeba Solo (standalone). The host name or IP address of your database server. It is usually localhost or 127.0.0.1 which are very different as far as the database connection is concerned. If localhost doesn't work, try 127.0.0.1 (note: these are dots, not commas, between the numbers). Otherwise please ask your host. Some hosts require something different in there, e.g. database123.example.com.
- User name
-
Only for Akeeba Solo (standalone). The user name you use to connect to your database. This is provided by your host.
- Password
-
Only for Akeeba Solo (standalone). The password you use to connect to your database. This is provided by your host.
- Database name
-
Only for Akeeba Solo (standalone). The name of your database. This is provided by your host.
- Prefix
-
Only for Akeeba Solo (standalone). This is the common prefix of all database tables used by your site. This is usually visible in your site's administrator pages (e.g. in Joomla! it's under Global Configuration) or in your site's configuration files (e.g. for WordPress it's in the
wp-config.phpfile). If you are unsure open your site's database and check the common prefix of the tables in there. It's usually very obvious what the prefix is: most or all of your tables start with the same few letters and numbers followed by an underscore. These letters and numbers and the trailing underscore are the "database table name prefix". - Include Akeeba Solo in the backup
-
Only for Akeeba Solo (standalone). If you have installed Akeeba Solo inside the root of the site being backed up, by default Akeeba Solo is excluding its files, folders and database tables from the backup. By selecting this option you instruct Akeeba Backup to lift this restriction and allow its files, folders and database tables to be backed up.
Warning If you have installed Akeeba Solo outside the root of the site you are backing up selecting this option will NOT result in the inclusion of Akeeba Solo's files. You will have to do that manually through the Off-site Directories Inclusion feature from the main page of Akeeba Solo.
| Note |
|---|---|
|
If you are using Akeeba Solo (standalone), please note that all the options from Script Type up to Prefix are more easily set up using the Configuration Wizard than through this page. |
Advanced configuration
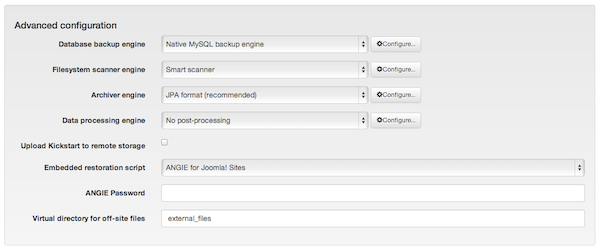
- Database backup engine
-
This option controls how the application will access your database and produce a dump of its contents to an SQL file. It is used with all backup types, except the files only type. The available options for this setting are discussed in the Database dump engines section of this document.
- Filesystem scanner engine
-
This option controls how the application will scan your site for files and directories to back up. The available options for this setting are discussed in the File and directories scanner engines section of this document.
- Archiver engine
-
This option controls which kind of archive will be produced by the application. The available options for this setting are discussed in the Archiver engines section of this document.
- Data processing engine
-
The application allows you to post-process the backup archives once the backup process is over. Post-processing generally means sending them somewhere off-server. This can be used, for example, to move your backup archives to cloud storage, increasing the safety of your data. The available options for this setting are discussed in the Data processing engines section of this document.
- Upload Kickstart to remote storage
-
By selecting this option you instruct the application to also upload kickstart.php on the remote storage alongside your backup archive. When used with the Upload to Remote FTP Server and Upload to Remote SFTP Server you can perform easy site transfers without leaving the comfort of your browser. Just enter the new site's (S)FTP information in the Data Processing Engine configuration and select the Upload Kickstart to Remote Storage option, then take a new backup. When the backup is complete just open the new site's kickstart.php URL (e.g. http://www.example.com/kickstart.php) in your browser to begin the restoration on the new site's server. This even works with mobile devices (we strongly recommend using a tablet or phablet with a display size of at least 7"), allowing you to clone sites even you are on the go!
- Archive integrity check
-
When enabled Akeeba Backup will go through the archive extraction process without writing anything to the disk. This makes sure that the archive is not corrupt. If the archive is found to be corrupt an error is raised and the backup process stops.
This feature will NOT work when the Process each part immediately option is enabled in the Post-processing Engine configuration. When you are processing each part immediately the backup archive parts are transferred away from your server before the end of the backup is reached. As a result it is not possible to do a test extraction (the archive file parts are no longer there, so there's nothing to try and extract). It WILL however work when you are simply using a post-processing engine (e.g. Upload to Amazon S3) without the process each part immediately option. Please bear in mind that the integrity check runs BEFORE post-processing (uploading) the backup archive parts to remote storage because there's no reason to put a broken archive for safe-keeping in remote storage.
This feature will only work if you are using an Archiver Engine which creates backup archives. This is typically the case with most Archiver Engines. Notable exceptions are, of course, the DirectFTP and DirectSFTP engines which do not produce backup archives. If you enable this feature on a backup profile using either of these Archiver Engines you'll get a warning.
Enabling this feature will increase the time required to complete the backup process and use substantially more memory and CPU resources. Akeeba Backup goes through the same archive extraction process as Kickstart with the only difference that it does not write anything to the disk.
Finally do keep in mind that this feature only makes sure the archive can be extracted, it does not test whether the database data can be restored or if the restored site works correctly. It's still up to you to do a periodic, complete test restoration of your site.
- Embedded restoration script
-
The application will include a restoration script inside the backup archive in order to make restoration easy and the backup archive self-contained. You do not need anything else except the archive in order to restore a site. Restoration scripts honour the settings in your site's configuration, modifying only those necessary (for example, the database connection information), allowing you to create pristine copies ("clones") of your site to any host.
Important It is very important to choose the right archiver engine for the script / CMS used by your site. Choosing the right script makes your life much easier when restoring your site. For further information please take a look at the documentation of the Configuration Wizard.
- Virtual directory for off-site files
-
Using the off-site directories inclusion of the application, the application will be instructed to look for files in arbitrary locations, even if they are outside the site's root (hence the name of that feature). All the directories included with this feature will be placed in the archive as subdirectories of another folder, in order to avoid directory name clashes. We call this folder the "virtual directory", because it doesn't exist on the server at the time of the backup, it only exists inside the backup archive. The restoration script will allow you to move these files and directories from the "virtual directory" (extracted inside your site's root) to their correct, off-site location at restoration time.
Optional filters

This section contains optional inclusion and exclusion filters which can be activated to customize your backup procedure. The available filters are:
Date conditional filter
It allows you to backup only files modified after a specific date and time. This is different than the incremental file only backup. It allows you to backup files newer than the specified date no matter which backup mode (full site backup, files only backup, incremental files only backup) you are using. The available options are:
- Date conditional filter
-
Tick the checkbox to activate this filter
- Backup files modified after
-
Files before this date and time will be skipped from the backup set. The format for the date and time parameter is YYYY-MM-DD HH:MM:SS TIMEZONE. This means that you have to specify the year as four digits, followed by a dash, then the month as two digits (e.g. 09 for September), followed by a dash, then the day as two digits (e.g. 01 for the 1st day of the month). For example, September 1st, 2010 is written as 2010-09-01. If you want to specify the time, leave a space after the date and write down the time as the hour using two digits (00-23, no a.m./p.m. is supported!), then a semicolon, then the minutes as two digits, followed by a semicolon, then the seconds as two digits. For example 59 seconds after 11:05 p.m. is written as 23:05:59. You can optionally leave a space after the time and specify the timezone as GMT+/-time. For example, GMT-6 is Dallas time which is six hours behind the GMT and GMT+2 is two hours ahead of GMT which is the Eastern Europe Time. If you do not specify a timezone the GMT timezone is assumed.
Important You have to set your server's timezone in the System Configuration page for this feature to work reliably. If you get strange results, try editing the System Configuration.
Quota management

- Current backup participates in remote file quotas
-
When enabled the backup which is in progress participates in the remote quotas. Please note that the backup currently in progress always participates in quotas calculated for files stored locally, on the web server the backup is being taken on.
Warning Enabling this option may lead to a situation where you are left with no valid backup archives to restore your site from. We VERY STRONGLY recommend that you DISABLE this option.
A backup archive may consist of more than one part files, e.g. files with the same name but extensions such as .j01, .j02, …, .jpa for the JPA format (or the equivalent for JPS and ZIP format). It is possible that only some, but not all, of these files are uploaded to the remote storage. For example, you may have ran out of available space on the remote storage, or a temporary network issue prevented further uploads from taking place. This is NOT considered an error; some of the files are in remote storage and some are in local storage. Normally, you would have to rectify the issue, then go to the Manage Backups page and click on the “Transfer to
Remote Storage
                      Name
” button to complete the transfer.However, let's say that you have enabled the Remote Quotas option and set up quota settings such that would result in all backup archive files previously uploaded to the remote storage being deleted. In this case your remote storage does NOT hold a complete, valid backup you can restore your site from.
If at this point something catastrophic were to happen to your site, before you could go to the Manage Backups page to complete the transfer of the partially uploaded backup archive, and completely lost access to the not yet uploaded backup archive parts still sitting on your web server you will find yourself in the dire position of having a non-functional site and no backup to restore the site from.
Please note that disabling this option will result in at least two (2) backups taken with this backup profile being present in your remote storage: the backup you last took (which did NOT participate in remote quota management) and the backup or backups which have not been deleted yet by the remote quota management.
If you have disabled this option and either set Count Quota to 1 or set Size Quota to something that is less than twice the size of a full backup taken with this backup profile you will see that there are two (2) backups stored remotely instead of only one. This is normal and expected. In fact, there is no way to only have one backup stored remotely except enabling this option. This is another way of telling you that only keeping the last backup in remote storage is dangerous and can indeed lead to a situation where you are left without a backup.
Please weigh the pros and cons of this option very carefully. We advise you to always err on the side of caution, storing several backups of your site in remote storage, ideally with some kind of planned redundancy. Paying a few cents or dollars more every month to ensure that you can recover your site if something goes awry with your server is far less expensive in the long run than risking your site being completely gone and unrecoverable in an unlikely —but not impossible!— cascade of events. Taking backups is risk mitigation which is itself an integral part of risk management. Risk management is not about what happens when everything goes according to plan; it's about surviving the worst case scenario, the unknown, when nothing goes according to plan.
- Enable maximum backup age quotas
-
When checked, the application will only apply quotas based on the date and time the backup was started. This allows you to easily do something like "keep daily backups for the last 15 days and always keep the backup taken on the first of each month".
Warning Enabling this option causes the size and count quotas to be ignored.
- Maximum back age, in days
-
Only applies when the Enable maximum backup age quotas option is enabled.
Backups older than this number of days will be deleted. Newer backups will not be deleted.
- Don't delete backups taken on this day of the month
-
Only applies when the Enable maximum backup age quotas option is enabled.
Even when a backup is older than the Maximum back age, in days setting, it won't be deleted if it was taken on this day of the month. For example, if you set this to 1, backups taken on the first day of each calendar month will not be deleted. Setting this option to 1, the backup age to 31 and enabling the maximum backup age quotas you end up keeping all backups taken during the last month and keeping the backups taken on the first of each month.
- Obsolete records to keep
-
When the locally stored files of a backup are deleted (either manually or automatically after uploading it to a remote storage) the record is marked as Obsolete or Remote. Some users prefer to limit the number of the backup entries showing in the Manage Backups page. This option instructs the application to keep at most that many obsolete/remote records and automatically delete older obsolete/remote entries. This is different than the rest of the quotas because it doesn't remove files from your server, it removes the backup record from the application's interface.
- Enable size quota
-
When checked, old backup archives will be erased when the total size of archives stored under this (and only this) profile exceed the Size quota setting. This setting is ignored when maximum backup age quotas are enabled.
- Size quota
-
Defines the maximum total size of backup archives under the current profile to keep. Only has an effect if the previous option is activated.
Warning When you are uploading backup archives to remote storage and have enabled the Process each part immediately then Size Quotas will not work correctly. Due to the internal workings of the backup engine when Process each part immediately is enabled the size of each backup cannot be determined correctly.
- Enable count quota
-
When checked, old backup archives will be erased when the number of backup archives stored under this profile exceed the Count quota setting. This setting is ignored when maximum backup age quotas are enabled.
- Count quota
-
Defines the maximum number of backups under the current profile to keep. Only has an effect if the previous option is activated.
- System Restore Points quota
-
This option is currently ignored and has no effect in Akeeba Solo / Akeeba Backup.
Fine tuning
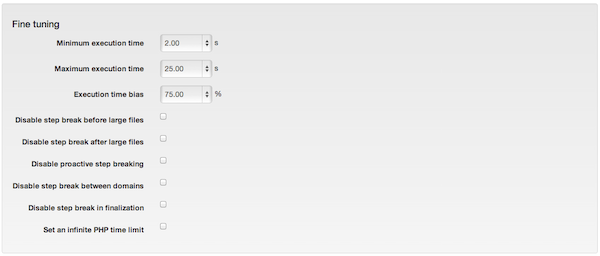
- Minimum execution time
-
Some servers deploy anti-hacker measures (such as mod_evasive or mod_security2 for Apache) which will deny connections to the server if the same URL is accessed multiple times in a limited amount of time. The application has to call its backup URL multiple times to step through the backup process without timing out, therefore it runs the risk of being treated as a potential hacker and denied connection to your server, resulting in backup failure.
In order to work around this issue, the application can throttle the rate of server requests using this setting. A minimum execution time of 2 seconds means that calls to the backup URL will happen at most once every two seconds.
If you want to speed up the backup try decreasing it to zero. If the backup fails inexplicably, try increasing it. If you are in doubt and don't know what to do, please leave this to the default setting of 2 seconds, or whatever the Configuration Wizard found out works the best on your server.
- Maximum execution time
-
The application has to divide the backup process in to individual small steps in order to avoid server timeouts. However, it has to know how small or big they have to be; that's why this setting exists. The application will try to avoid consuming more time per step than this setting. You have to use a number lower than the
maximum_execution_timesetting in your host's php.ini file. In fact, we suggest using 50% of that value here: if your host allows up to 30 seconds in the php.ini, you have to enter no more than 15-17 seconds here. If unsure, 7 seconds is a very safe value under most configurations. - Execution time bias
-
When the application calculates the available time left for performing operations within the current backup step a number of external settings may skew this result and lead to timeout errors. This setting defines how conservative the backup engine will be when performing those calculations and is expressed as a percentage of the Maximum execution time parameter. The lower this setting is, the more conservative the application gets. It is suggested not to use a value over 75%, unless you have a high-end, high performing server. If you experience server timeouts, you may want to lower this setting to a value around 50%.
- Resume backup after an AJAX error has occurred
-
When this option is unchecked Akeeba Solo will completely stop the backup when the server responds with an error or the communication with the server is cut short. When this option is enabled (default), Akeeba Solo will try to resume the backup by repeating the last backup step. This will not let you successfully resume all backups which result in an error: only backup attempts temporarily blocked by server CPU usage restrictions or network outage issues can be resumed. If the backup fails due to a timeout error, memory outage, incompatible server software etc the backup resumption will result in the same error until it leads to a permanent backup failure.
Important This feature only applies to back-end backups. This feature will not be taken into account when you have enabled the Process each part immediately option in the configuration of the Data processing engine since it's impossible to retry backing up to a backup archive which may have already been transferred to remote storage and removed from the server.
- Wait period before retrying the backup step
-
How many seconds to wait before resuming the backup. It is advisable to set this to 30 seconds or more (120 seconds is recommended in most cases) to give your server / network the necessary time to recover from the error condition which caused your backup to fail.
- Maximum retries of a backup step after an AJAX error
-
How many consecutive times should we retry resuming the backup before finally giving up and throwing a permanent error (backup failure). 3 to 5 retries work best on most servers.
- Disable step break before large files
-
When the application detects a large file (see the filesystem scanner engine configuration) it will try to break the execution of the current backup step and start backing up the large file in its own backup step. This is a conservative behaviour that increases the likelihood of being able to backup large files but makes the backup slower. If you check this box the backup will become faster, but it might fail backing up larger files.
- Disable step break after large files
-
When the application finishes backing up a large file (see the filesystem scanner engine configuration) it will try to break the execution of the current backup step and continue the backup process in a step. This is a conservative behaviour that decreases the likelihood of the backup engine timing out after backing up a large file but makes the backup slower. If you check this box the backup will become faster, but it might fail after backing up larger files.
- Disable proactive step breaking
-
The application tries to guess how much time it will take it to backup each file. If it believes that backing up the next file in its queue will take too long it will break the backup step and continue the backup in a new step. This decreases the likelihood of server timeouts, at the expense of making the backup a little slower, especially if you have lots of tiny files. If you check this box the backup will become faster, but it might fail in some cases.
- Disable step break between domains
-
Do not check this box unless you are instructed by our support staff. The possibility of needing this option has been found to be less than 0.1%.
- Disable step break in finalization
-
Do not check this box unless you are instructed by our support staff. The possibility of needing this option has been found to be less than 0.1%.
- Set an infinite PHP time limit
-
If your server is using the CGI or FastCGI interface to PHP, checking this option will make it less likely that the backup dies due to a PHP timeout issue. We consider it generally safe checking this box as we have never observed or got reports of any side-effects.