![[Note]](/media/com_docimport/admonition/note.png) | Note |
|---|---|
|
Some of the features described below are only available in the Professional release |
The Web Application Firewall feature of Admin Tools is designed to offer real-time protection against the most common attacks, including the fingerprinting attacks used by attackers to deduce information about your site in order to tailor an attack to it.
When you launch the Web Application Firewall feature of Admin Tools you are presented with its control panel page:
The Web Application Firewall page
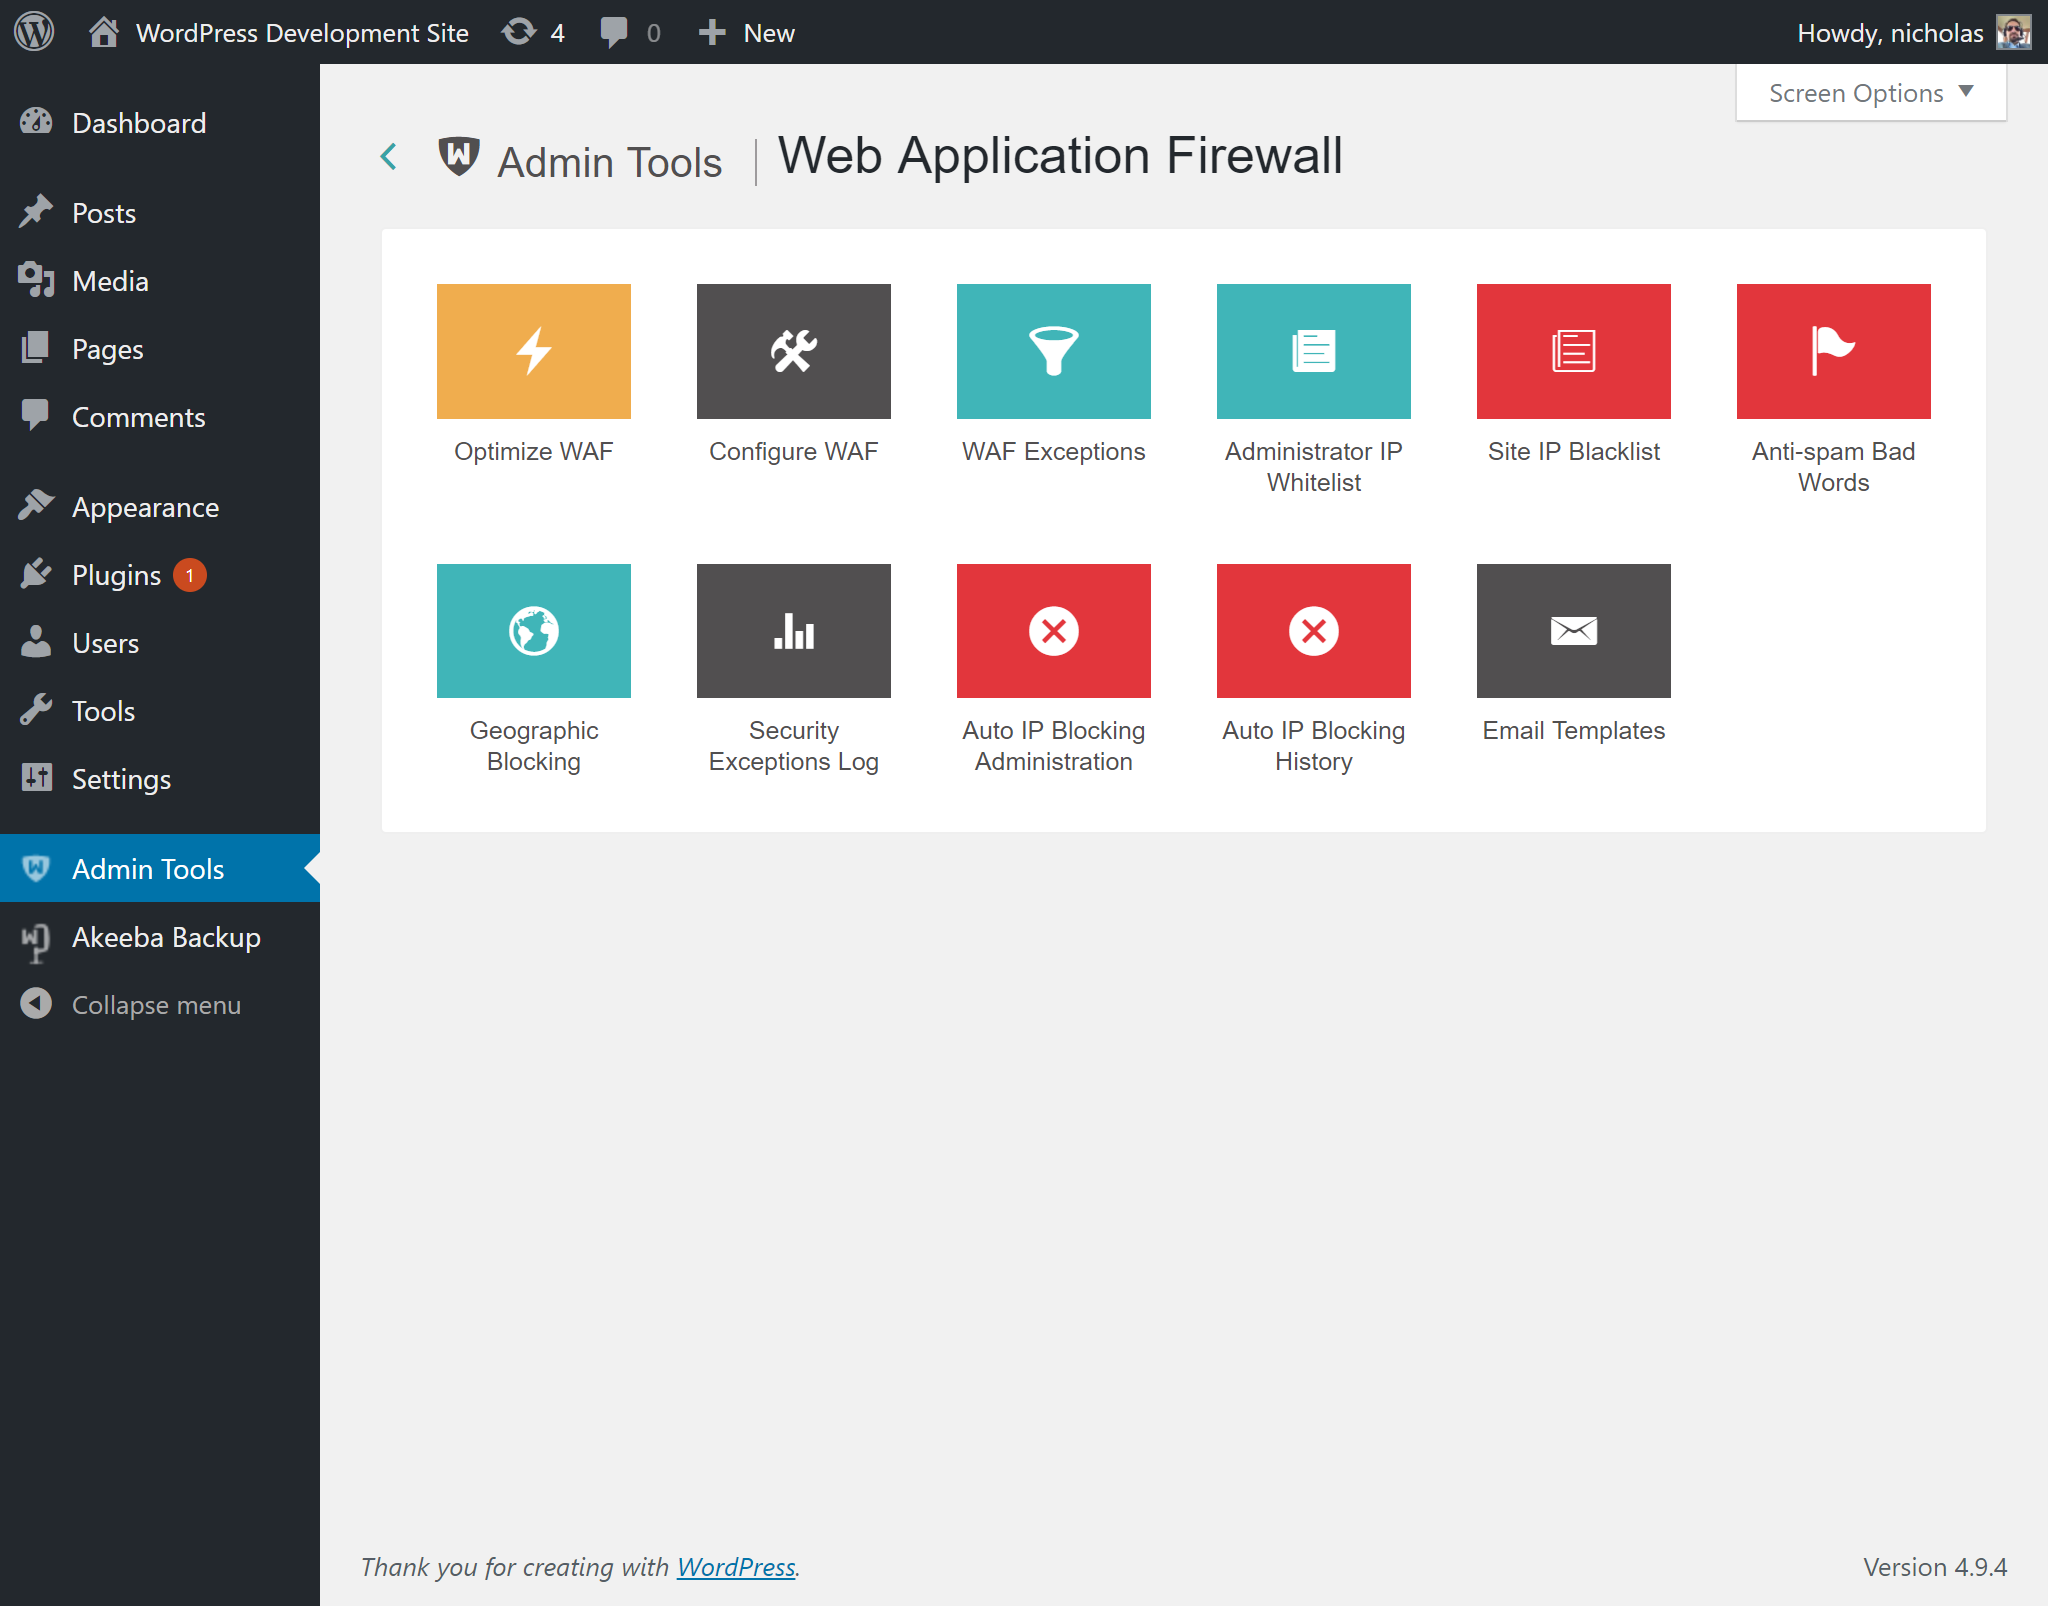
Clicking on any icon will take you to the respective page.
Help! I used WAF and now I am locked out of my site
Open your site with an FTP programme or using your hosting provider's File Manager feature. Go to the web root of your site, typically called public_html or htdocs. If you're not sure please ask your host.
Navigate into the folder
wp-content/plugins/admintoolswp/app/plugins/waf/admintools
There's only one file called main.php Rename
it to main.php.bak
Now you have regained access to your site.
Go to Admin Tools, Web Application Firewall and fix the issue that caused you to get locked out (see the "How do I unblock myself" section below).
After you're done rename the main.php.bak
file back to main.php for WAF to be active again
and protect your site.
How do I unblock myself
See the section above for regaining access to your site.
In most cases the easiest way to unblock yourself is simply going to and click the big button. If this doesn't work, or the button is not visible, follow the instructions below.
Do remember to rename back main.php -or run Optimize WAF again- after you're done unblocking yourself!
Automatically banned IP address
Go to and click the button. Delete all records with your own IP address.
Then, go back to Web Application Firewall and click on the button. Select the record showing your IP address and click on the button to delete the block.
![[Tip]](/media/com_docimport/admonition/tip.png) | Tip |
|---|---|
|
Don't know what your IP address is? Just visit whatismyipaddress.com to find out! |
If this problem keeps happening without you doing anything and the IP blocked is NOT the same as the one reported by whatismyipaddress.com you will have to do one more thing. Go to , and click on the button. In the first tab set Enable IP workarounds to Yes.
If that was not the case, you have two options. The first is to troubleshoot the reason of the ban. Go to , , and check the Reason and Target URL for the entries which have your IP address in the IP address field. Find the reason in the "List of blocking reasons" documentation page to find out why you're being blocked. If you are not sure what that means, please file a support ticket remembering to copy the information from the Security Exceptions Log. Kindly note that you need to have an active subscription to receive support.
The second option at your disposal is adding your IP address to either of the IP whitelists, as follows.
The first approach is to add your IP address to the Administrator IP Whitelist. Using this option will limit access to the administrator section of your site only to the IPs listed in the whitelist. We strongly recommend you to not use it unless you and all of your back-end users have static IP addresses. In all other cases you may get blocked out of your site. Go to , and click the button. Add your own IP address.
The second approach is to use the Safe IP List. All IPs in that list will not be automatically banned. In order to do that, go to , and click on the button. Inside the Auto-ban Repeat Offenders area find the Never block these IPs field. This is a comma-separated list. Add the IPs you want to never be automatically blocked separated by commas on that list.
Administrator IP white-listing
If you have enabled administrator IP white-listing, you have to make sure that your IP address is included in the white-list in order to be able to access your site. Go to , and click the button. Add your own IP address.
![[Warning]](/media/com_docimport/admonition/warning.png) | Warning |
|---|---|
|
Don't use the Administrator IP Whitelist if your ISP assigns an IP address dynamically. This is the default unless you are paying them extra for a "static IP". Please note that having a dynamic DNS solution, such as what is offered by Dyn.com, and having a static IP address are two exactly opposite things. The former regularly updates a DNS entry (domain name) to point to your ever changing IP address. The latter means that your IP address never, ever changes. Using the IP whitelisting requires a static IP address which never, ever changes. If all you got is a dynamic DNS solution then this feature is NOT for you and you should not use it. Also bear in mind that using dynamic DNS for IP whitelisting would not only make your site very slow (as you'd have to resolve the dynamic domain on every page load) but you'd also have a security risk e.g. by having an attacker forcibly disconnect you from the ISP, hijacking your dynamic DNS account etc. |
IP black-listing
If you have enabled IP black-listing, you have to make sure that your IP address is not included in the blacklist in order to be able to access your site. Go to , and click the button. Remove your own IP address.
Administrator Secret URL parameter
The immediate symptom to that is that you cannot access
/wp-admin on your site.
If you have forgotten your Administrator Secret URL parameter go to Admin Tools, Web Application Firewall, Configure WAF, click on the Basic Protection Features tab and find the Administrator secret URL parameter option. Change or remove all of the text in that box to reset or unset, respectively, this feature.
Please remember that you should only use lowercase and uppercase letters A-Z without accents or diacritics, numbers 0-9, underscores and dashes only in your secret URL parameter. If you are using any different character you will need to URL-encode it or your browser will NOT be able to communicate it correctly to your server, therefore leading to your inability to access your site.
Please keep in mind that on most servers the secret URL parameter is case sensitive, i.e. abc, ABC and Abc are three different parameters.
Finally, please note that on some servers you may have to access
your site's wp-admin as
https://www.example.com/wp-admin/index.php?secret where
https://www.example.com is the URL to your site and
secret is your administrator secret URL parameter. Pay
attention to the /index.php? part (including the slash and
the question mark) in that URL. Some servers really do require that
bit.
| Note |
|---|---|
|
Some of the features described below are only available in the Professional release |
The Web Application Firewall is a series of individual protection features which run at various stages of WordPress preparing a page for display.
These features can be loaded by either of two ways.
-
Regular WordPress plugin. This is the simplest and recommended method for most users. Admin Tools installs the file
wp-content/mu-plugins/admintoolswp.php(relative to your site's root directory). This file runs every time WordPress is processing a page. It uses WordPress hooks to trigger the relevant features when something interesting happens. While this is the simplest method to run Admin Tools, it only protects code running inside WordPress itself. If you have a plugin with directly web accessible .php files which do not load WordPress they are left unprotected. As a result they can be used to hack your site.PROS: Easier to implement. Less likely to interfere with third party software running outside WordPress.
CONS: Does not protect against vulnerabilities in web accessible .php files which don't go through WordPress.
-
Auto-prepend script. In this mode you tell your web server to load Admin Tools' Web Application Firewall every time it tries to process a .php file, be it one of WordPress' files or any directly web accessible script. While this is the most powerful method it has two disadvantages. First, you need to know the exact server technology you are using so that the correct .htaccess code can be generated. Second, it only works on Apache and LiteSpeed web servers which understand .php files (otherwise you'd have to modify your PHP configuration).
PROS: Offers more complete protection.
CONS: Harder to implement. More likely to interfere with third party software running outside WordPress.
The Optimize WAF page allows you to apply the Auto-prepend Script mode. You will need to select the technology used by your web server:
The Optimize WAF page
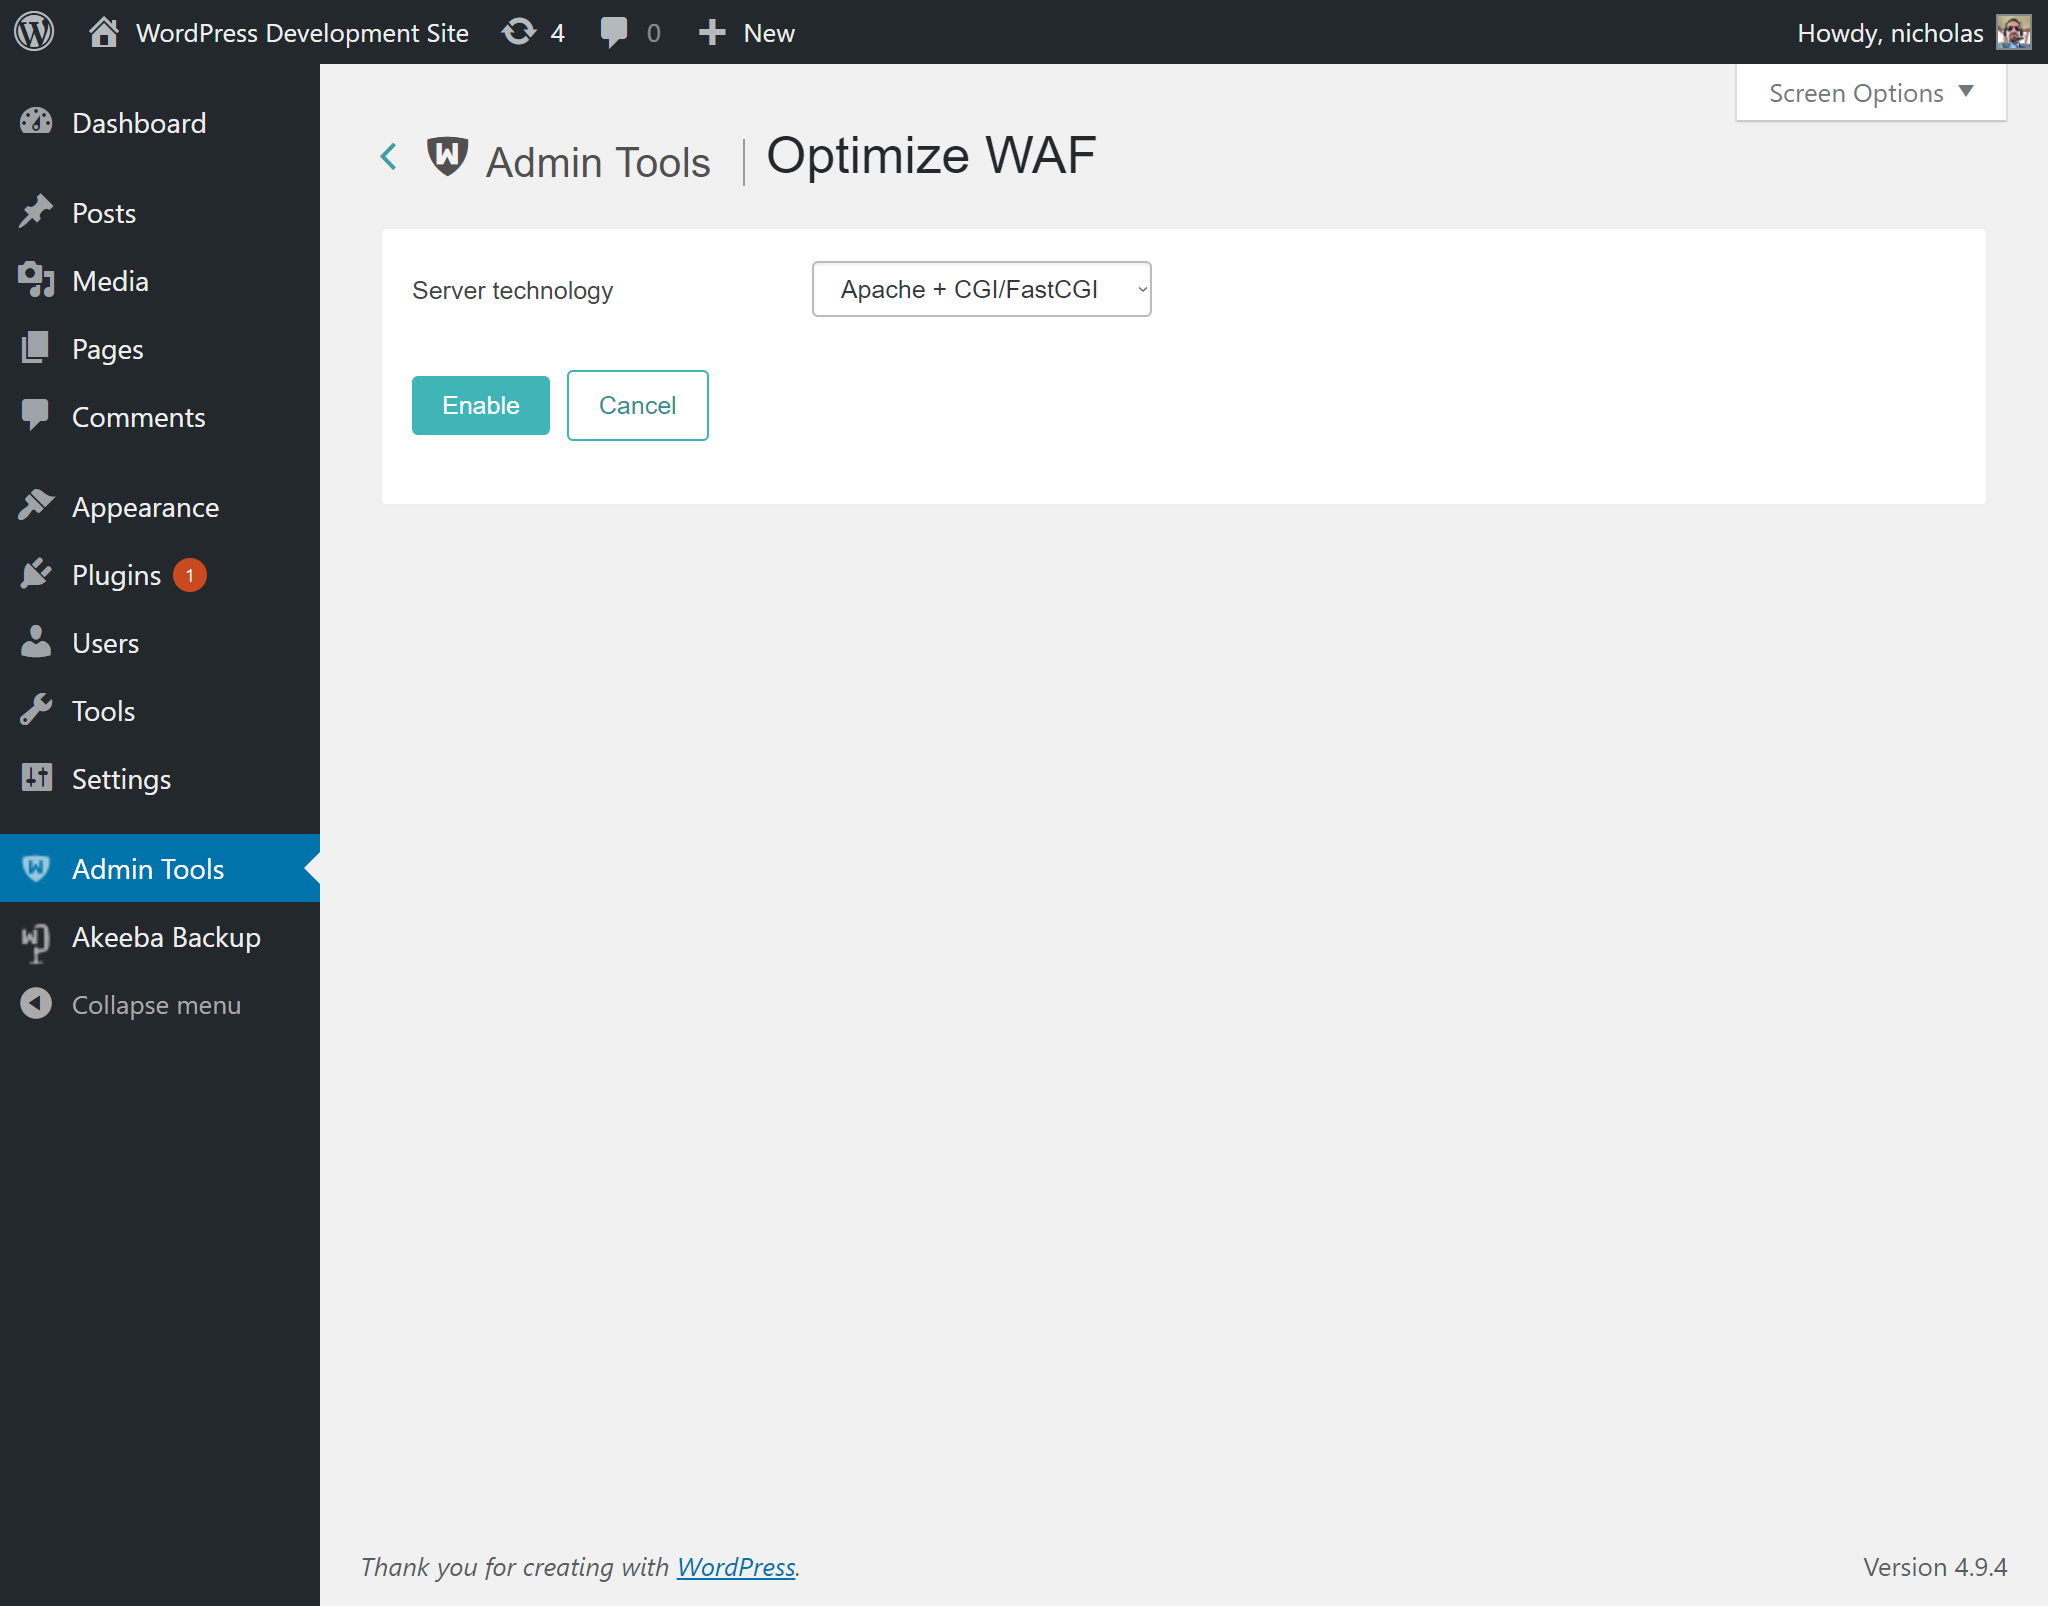
If you are not sure which server technology is used by your site's server please ask your host. They know and they can tell you very easily which one of the options applies to you. It is, however, impossible for you, us or any third party which hasn't set up the server to tell which technology is being used without a lot of trial and error.
I tried using this feature and my site broke. Help!
Open your .htaccess file over FTP or through your hosting provider's File Manager feature. It's located in the web root of your site, typically called public_html or htdocs. If you're not sure please ask your host.
Find the lines
# +++OptimizeWaf+++
and
# ---OptimizeWaf---
in that file. Delete everything between them, including these two lines.
Save the file.
| Note |
|---|---|
|
The next steps may not apply to you. Under some server technologies there is no .user.ini file created. |
Next up, open the file .user.ini (note the
leading dot!) in your site's root. If you do not see that file please
make sure that your FTP client or your hosting provider's file manager
are configured to show hidden files. All files whose name starts with
a dot are hidden on most servers.
Find the lines
; AdminTools WAF
and
; END AdminTools WAF
in that file. Delete everything between them, including these two lines.
Save the file.
On some hosts you may have to wait a few minutes for the changes in these two files to take effect.
I have an NginX or IIS server
It should be possible by using the Apache +
CGI/FastCGI option on this page. This creates a
.user.ini file in your site's root to load the
auto prepend file admintools-waf.php created in
your site's root. This is something which works with all FastCGI
implementations, including the ones used by NginX and IIS.
If you have a really old IIS server which uses PHP as a SAPI filter you're out of luck. Also, you're running an obsolete version of PHP with known security vulnerabilities. The only reasonable thing to do is upgrade PHP to a modern version. By doing so you have to use PHP in CGI or FastCGI mode, therefore you can use the Optimize WAF feature.
I am using the FastCGI option but it keeps telling me that the changes have not taken effect
This feature creates a .user.ini file in the root of your site (the same folder where your site's main index.php file is located in). The contents of these files are cached. By default, the cache time is 5 minutes. Some hosts increase the cache time up to an hour. So the first thing you should do is wait for up to an hour.
If nothing happens after more than an hour it's possible that you have a problem with .user.ini files not cascading properly. On most servers the settings of .user.ini files cascade, i.e. they are applied when accessing PHP files inside any subdirectory of the main directory where the .user.ini file is located. However, if you are on Windows or using a thread pool for your FastCGI implementation it's possible that the .user.ini files do NOT cascade. In this case please copy the .user.ini file into all subdirectories of your site. Alternatively, copy its contents into your site's PHP configuration (php.ini file) if possible. Finally, there's another alternative: convert its contents into .htaccess code and place that code into your site's .htaccess file.
If you are unsure what any of this means please do ask your host and show them this documentation page. They know how their server is set up and they can guide you on which steps are necessary.