This is accessible through the back-end , menu item and then clicking on the Tickets link below the component's toolbar.
Tickets
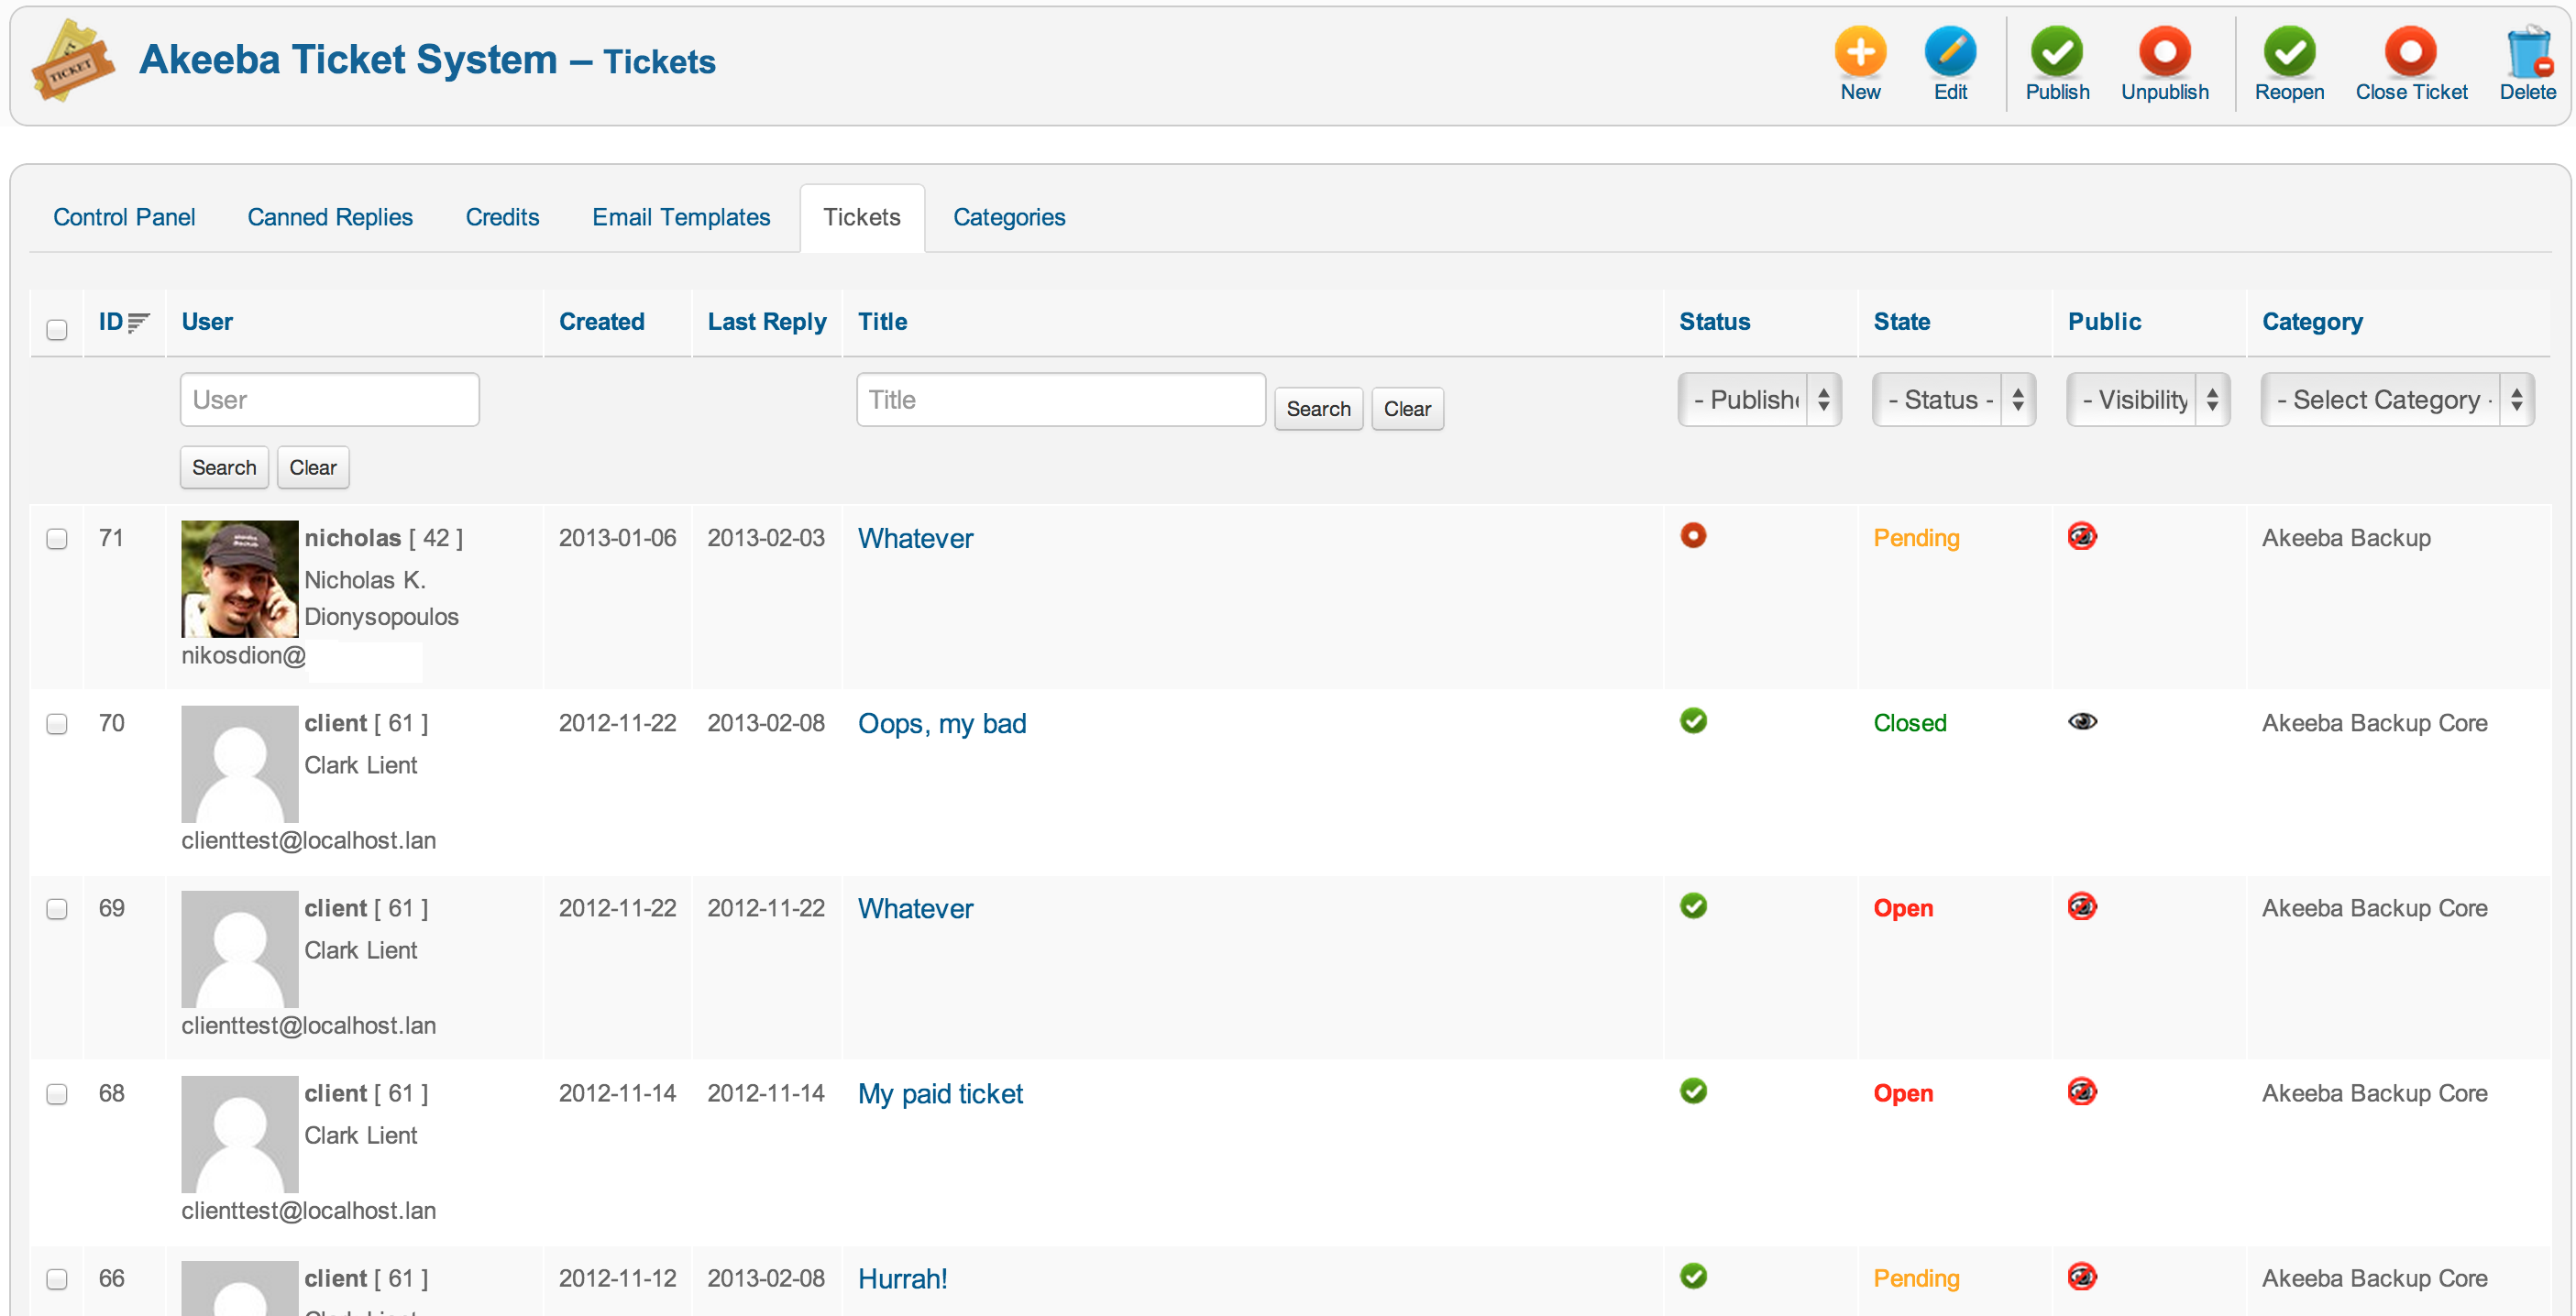
This is the most important page in Akeeba Ticket System. This is where you can review, manage and reply to your tickets from your site's back-end.
![[Note]](/media/com_docimport/admonition/note.png) | Note |
|---|---|
|
You can always also reply to the tickets from the front-end. Replies from the back-end is a convenience feature, not the recommended practice. |
The fields you see on each ticket are:
- ID
-
The numeric ticket ID. This is the unique identifier of every ticket and is always shown in the component's front-end.
- User
-
The username, numeric user ID, full name and email address of the user who created the ticket. The avatar image is supplied by plugins in the
atsplugin group. By default, the Gravatar plugin is enabled and displays user avatars based on their email address. - Created
-
The date when the ticket was created. The date is always shown in GMT timezone.
- Last Reply
-
The date of the last reply of the ticket. The date is always shown in GMT timezone.
- Title
-
The title of the ticket, as entered by the user who created the ticket.
Above the title you can see the ticket assignment information. You may see one or more of the following:
-
A blue flag icon. Clicking on it will assign the ticket to you.
-
A red flag icon. Clicking on it will unassign the ticket.
-
A gray badge reading "Unassigned". It means that this ticket is not assigned to any member of the support staff.
-
A blue badge reading the name of a member of the support staff. This means that the ticket is assigned to that member of the support staff.
-
The blue Assign to drop down list button. Clicking on it displays a drop-down with people in the support staff. Click on a name to assign the ticket to that person.
The ticket assignment is currently for internal information purposes, allowing your support staff to know who's working on which ticket.
-
- Time
-
Shows the total minutes of support time spent answering the tickets, as long as your support staff fills in the time spent box when replying to the ticket.
- Status
-
The status of the ticket. A red circle with a white spot means that the ticket is unpublished and not shown in the component's front-end. A green circle with a white checkmark means that the ticket is published and will be shown in the component's front-end. You can toggle the status by clicking on the icon.
- State
-
The state of the ticket. A ticket can be Open (the last reply was posted by the user who opened it), Pending (the last reply was posted by a member of the support staff) or Closed (the ticket is closed and the user who opened it can no longer reply to it).
If you have defined custom statuses in the component's Options page you may see the name of such a custom status here. Use the Status drop-down button to select the status you want to assign the ticket to.
- Public
-
A black eye icon means that the ticket is public and visible by everyone (depending on your menu item setting, this usually means that it's visible even by guest users). A black eye with a red circle and diagonal line means that the ticket is private. Only support staff and the user who filed the ticket can view it. You can toggle the Public state by clicking on the icon.
- Category
-
The category the ticket is filed under.
The toolbar contains the icons which allow you to manage your tickets:
- New
-
In this version of Akeeba Ticket System creating new tickets from the back-end is not allowed. Clicking on this button will produce an error message reading "You can not create new tickets from the back-end". This feature will be added in a later version of ATS.
- Edit
-
Edit the first ticket you have selected in the list
- Publish
-
Set the selected tickets' Status to Published. They will be visible in the component's front-end.
- Unpublish
-
Set the selected tickets' Status to Unpublished. They will no longer be visible in the component's front-end.
- Reopen
-
Set the selected tickets' State to Open. This allows you to re-open a ticket you or your user accidentally closed.
- Close ticket
-
Set the selected tickets' State to Closed. This allows you to manually close many tickets at once.
- Delete
-
Completely remove the ticket from the database.
![[Warning]](/media/com_docimport/admonition/warning.png)
Warning Use with extreme caution! Deleted tickets cannot be restored. There is no "Trash can" feature in Akeeba Ticket System. We strongly recommend unpublishing the ticket instead.
- Export as CSV
-
Exports the currently filtered list to a CSV file. You can import CSV files to Excel, Google Docs, Numbers or other third party systems.
Clicking on a ticket's title or checking its checkbox at the far left-hand side and clicking on the button opens the ticket editor page.
Edit a ticket
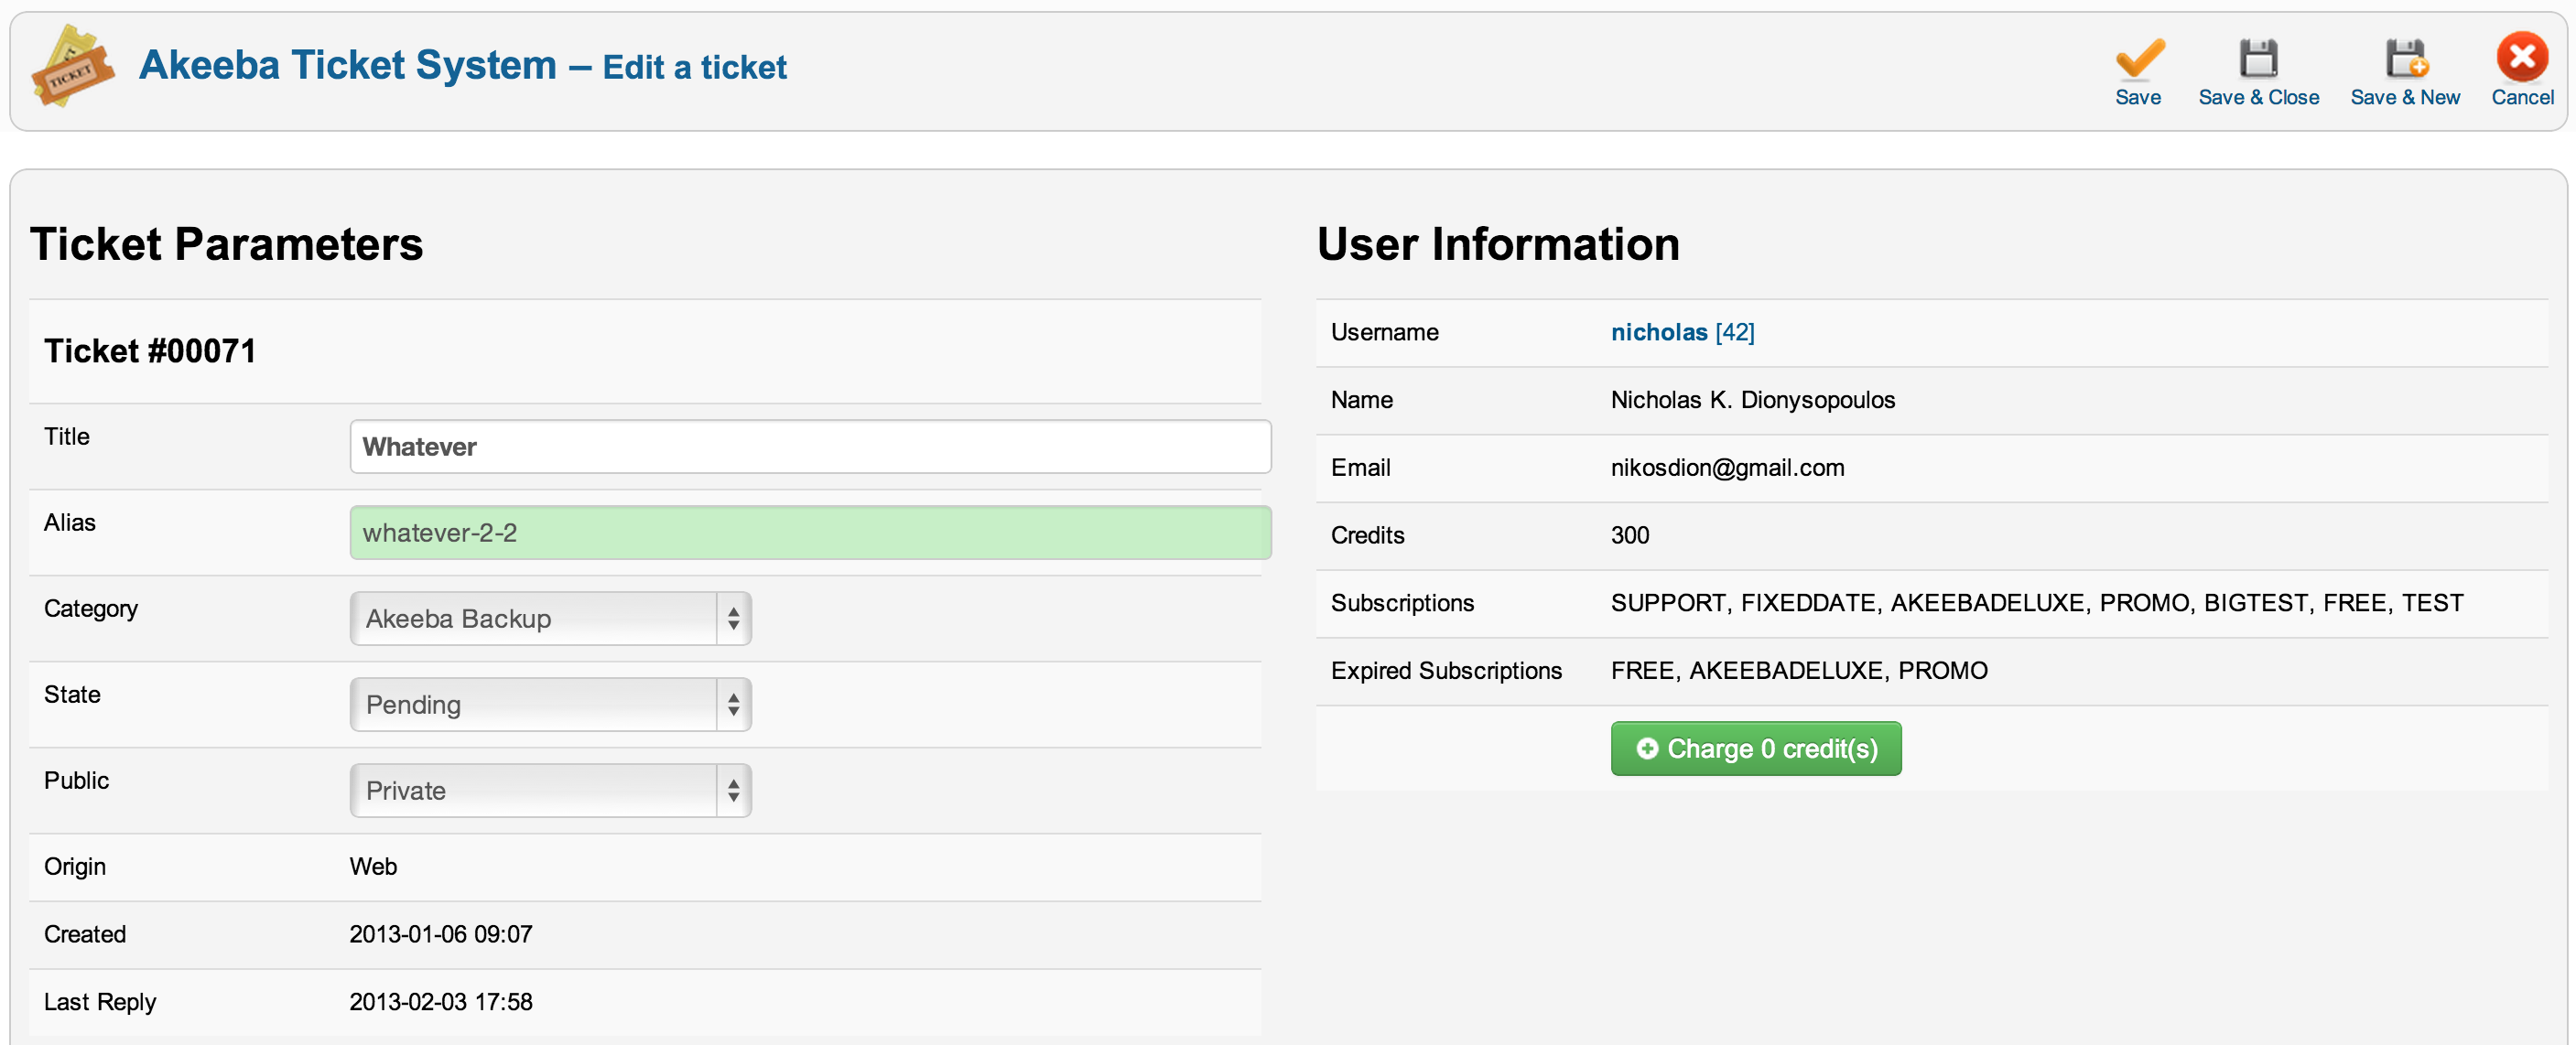
At the top of the page you have two areas with the basic information for a ticket.
On the left, you can find the Ticket Parameters area. The options there are:
- Title
-
The title of the ticket, to be shown in the component
- Alias
-
This is the alias of the ticket which, together with the ticket ID (shown in big, bold letters at the top of the ticket editor page) will be part of the URL to this ticket. The alias is automatically defined based on the ticket's title if left blank and when the ticket is created in the front-end.
![[Important]](/media/com_docimport/admonition/important.png)
Important If you get a blank page, a 403 Forbidden error page or a 406 Not Acceptable error page when you try accessing a ticket in the front-end the alias is the most likely culprit. Many servers use the mod_security2 Apache module. This is a kind of firewall which blocks requests based on several information they carry with them. Some words in the URL such as "MySQL", "drop", "table", "permissions", "grant", "wget" and "curl" in certain combinations can trigger mod_security2's protection and throw an error page when trying to access it. If the ticket's title contains such words, the alias (therefore: the URL) will contain them and cause mod_security2's protection to be triggered. In this case you have to go to the back-end of Akeeba Ticket System, edit the ticket and change its Alias to something different. This is not an issue with Akeeba Ticket System; it's how mod_security2 is configured on your server. We know that because we have the same kind of protection on our servers and have seen a few such cases over the first few months the component was in private beta, used on our own servers.
- Category
-
The category this ticket belongs to
- State
-
The state of the ticket (Open, Pending, Closed)
- Public
-
Is this ticket Private or Public?
- Ticket priority
-
The priority of the ticket, if you've enabled that feature in the component's Options page.
- Assign to
-
The member of the support staff that's assigned to this ticket.
- Bucket
-
The bucket this ticket belongs to. Buckets allow you to mass reply to tickets filed by different users about the same issue (see the relevant section in this documentation).
- Origin
-
(read only) How was this ticket submitted.
Webmeans that is was submitted through the front-end of your site.E-mailmeans it was created by an email sent by your client to the Category E-mail address. - Created
-
(read only) The date and time the ticket was created. The date and time is always shown in the UTC timezone.
- Last Reply
-
(read only) The date and time the ticket was last updated, usually this is the date and time of the last reply. The date and time is always shown in the UTC timezone.
On the right you can find the User Information area with the following read-only fields:
- Username
-
The username and numeric user ID of the user who has created this ticket. You can click on the username to open the Joomla! User Editor page for that user.
- Name
-
The full name of the user who has created this ticket.
-
The email address of the user who has created this ticket.
- Credits
-
How many credits the user who has created this ticket has left.
- Subscriptions
-
The active Akeeba Subscriptions subscriptions of the user who has created this ticket.
Note You obviously need to have Akeeba Subscriptions installed to see this field.
- Expired subscriptions
-
The inactive (expired or cancelled) Akeeba Subscriptions subscriptions of the user who has created this ticket.
Note You obviously need to have Akeeba Subscriptions installed to see this field.
Moreover you will see one of the following buttons:
- Charge X Credit(s)
-
If no credits have been charged to the user for creating this ticket, clicking on this button will charge him the amount of credits you've specified in the Category page.
- Refund X Credit(s)
-
If credits have been charged to the user for creating this ticket, clicking on this button will refund him the amount of credits he has been charged.
Right below you will find two tabs.
Edit a ticket - Conversation tab
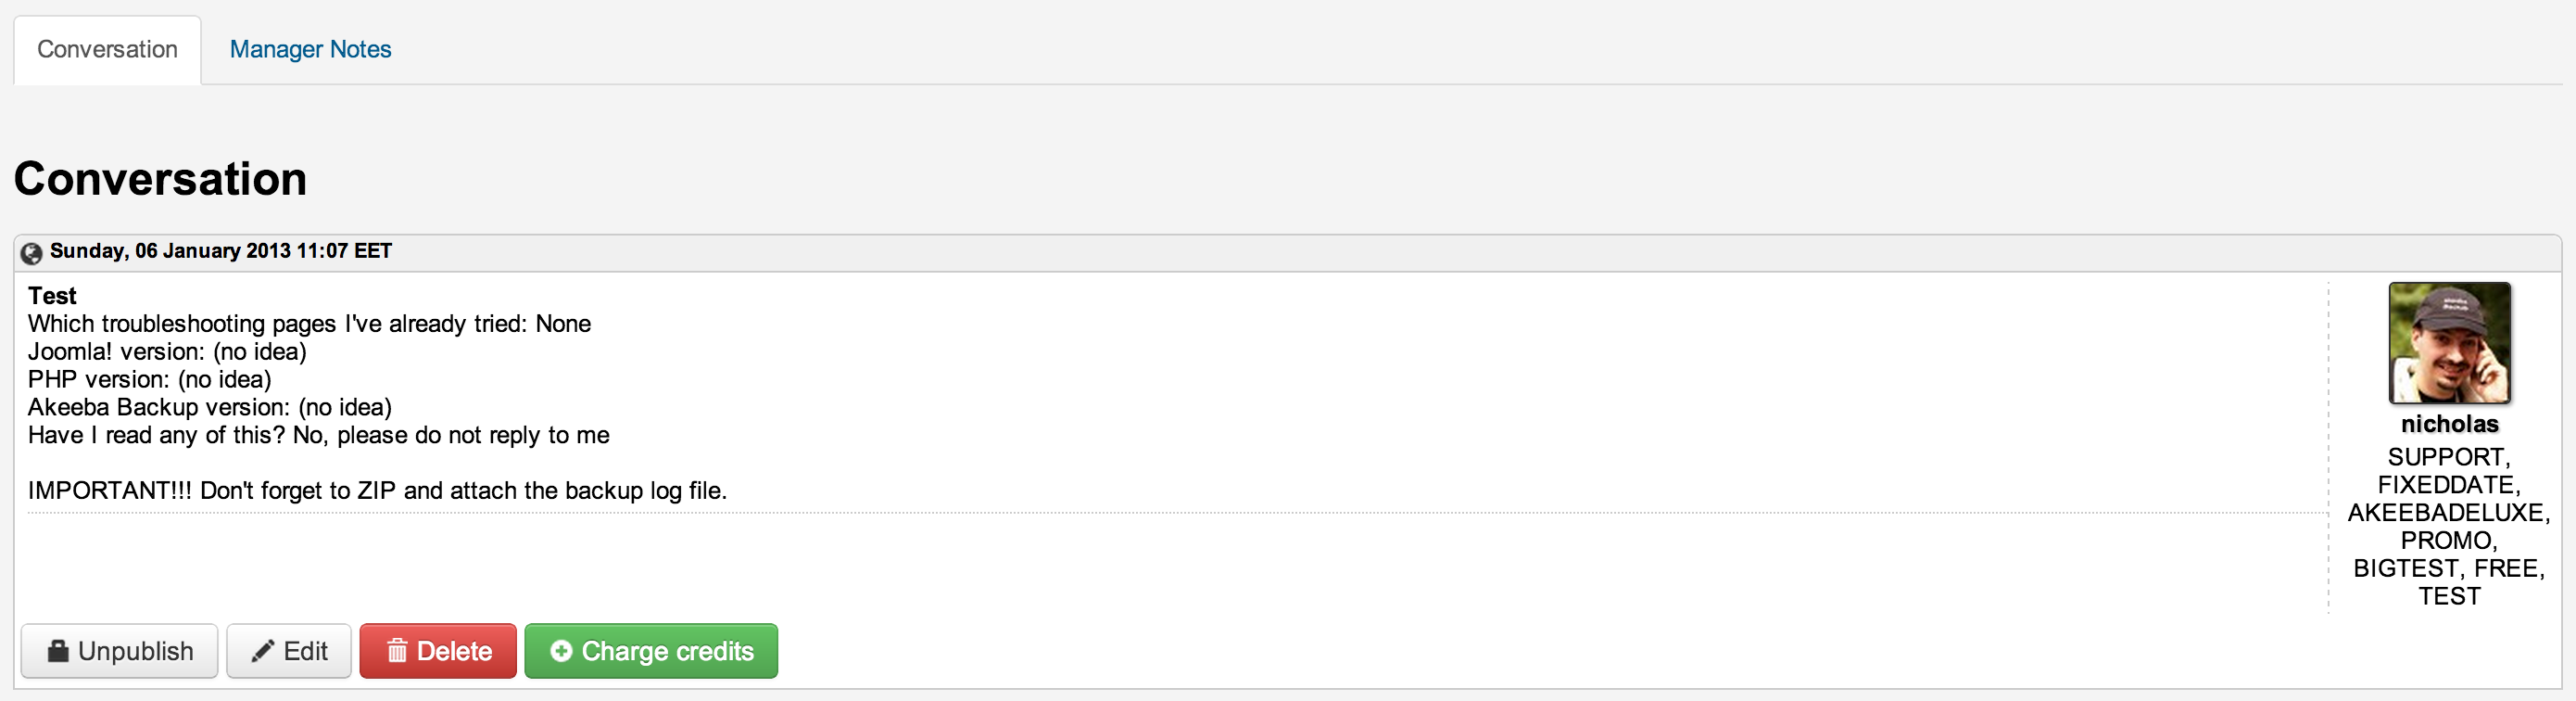
The Conversation tab contains the ticket thread which both you (the support staff) and the user see. Each post has some or all of the following buttons:
- Publish / Unpublish
-
Change the status of each post to published or unpublished. Unpublished posts are not seen in the front-end unless you are a member of the support staff. Members of the support staff and back-end users will see unpublished tickets in a light red background, together with a notice that the post is unpublished.
- Edit
-
Opens a post editor page where you can edit the text contained in the post. Very useful when a user accidentally publishes a password in a public ticket.
- Delete
-
Completely deletes the post.
Warning Deleting a post is irreversible. Use with extreme caution. You should unpublish the post instead.
- Charge credits / Refund X Credit(s)
-
Allows you to charge / refund credits for this post.
If you also have an attachment to your ticket you will see the following buttons next to it:
- Publish / Unpublish
-
Changes the published state of the attachment. Unpublished attachments are only visible to the support staff.
- Delete
-
Completely deletes an attachment (both the database record and the file on the disk)
Warning Deleting an attachment is irreversible. Use with extreme caution. You should unpublish the attachment instead.
Below the conversation you will find the Post a reply area where you can enter a reply to the user and an optional attachment. Use the button below it to submit your reply (and send an email to the user, if the respective plugin is enabled).
Edit a ticket - Manager Notes tab

The other tab is called Manager Notes. Manager notes are internal communication between the support staff and can also double as private notes. Only support staff can see them. The users cannot see the manager notes.
They work just like the Conversation view with a few differences:
-
You can not post attachments to Manager Notes.
-
Manager Notes are only seen by the support staff, not the users.
-
Other support staff does not receive an email when you post a new Manager Note.